python3之Splash的具体使用
目录
- 1、Scrapy-Splash的安装
- 2、Splash Lua脚本
- 3、Splash对象的属性与方法
- 4、响应对象
- 5、元素对象
- 6、Splash HTTP API调用
- 7、实例
Splash是一个javascript渲染服务。它是一个带有HTTP API的轻量级Web浏览器,使用Twisted和QT5在Python 3中实现。QT反应器用于使服务完全异步,允许通过QT主循环利用webkit并发。
一些Splash功能:
- 并行处理多个网页
- 获取HTML源代码或截取屏幕截图
- 关闭图像或使用Adblock Plus规则使渲染更快
- 在页面上下文中执行自定义JavaScript
- 可通过Lua脚本来控制页面的渲染过程
- 在Splash-Jupyter 笔记本中开发Splash Lua脚本。
- 以HAR格式获取详细的渲染信息
1、Scrapy-Splash的安装
Scrapy-Splash的安装分为两部分,一个是Splash服务的安装,具体通过Docker来安装服务,运行服务会启动一个Splash服务,通过它的接口来实现JavaScript页面的加载;另外一个是Scrapy-Splash的Python库的安装,安装后就可在Scrapy中使用Splash服务了,下面我们分三部份来安装:
(1)安装Docker
#安装所需要的包:
yum install -y yum-utils device-mapper-persistent-data lvm2
#设置稳定存储库:
yum-config-manager --add-repo https://download.docker.com/linux/centos/docker-ce.repo
#开始安装DOCKER CE:
yum install docker-ce
#启动dockers:
systemctl start docker
#测试安装是否正确:
docker run hello-world
(2)安装splash服务
通过Docker安装Scrapinghub/splash镜像,然后启动容器,创建splash服务
docker pull scrapinghub/splash
docker run -d -p 8050:8050 scrapinghub/splash
#通过浏览器访问8050端口验证安装是否成功
(3)Python包Scrapy-Splash安装
pip3 install scrapy-splash
2、Splash Lua脚本
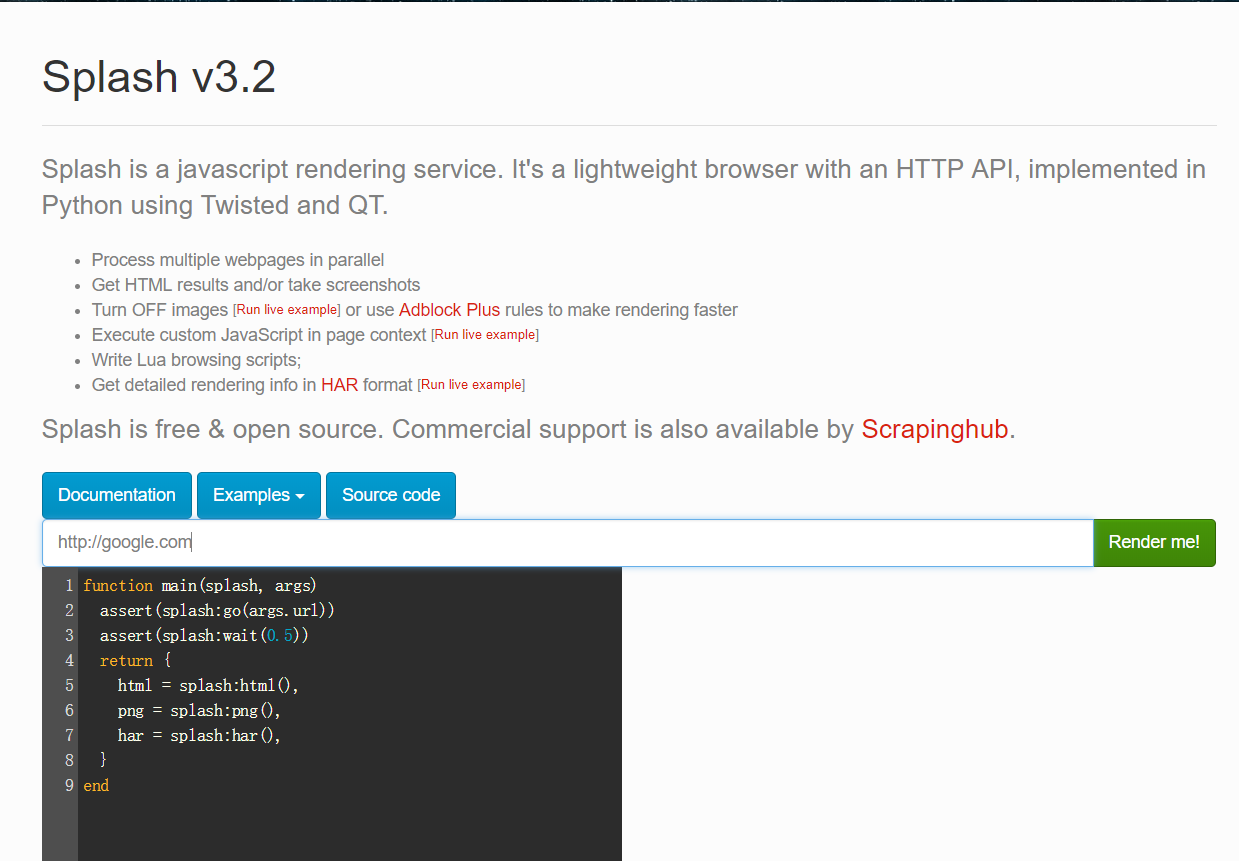
运行splash服务后,通过web页面访问服务的8050端口如:http://localhost:8050即可看到其web页面,如下图:

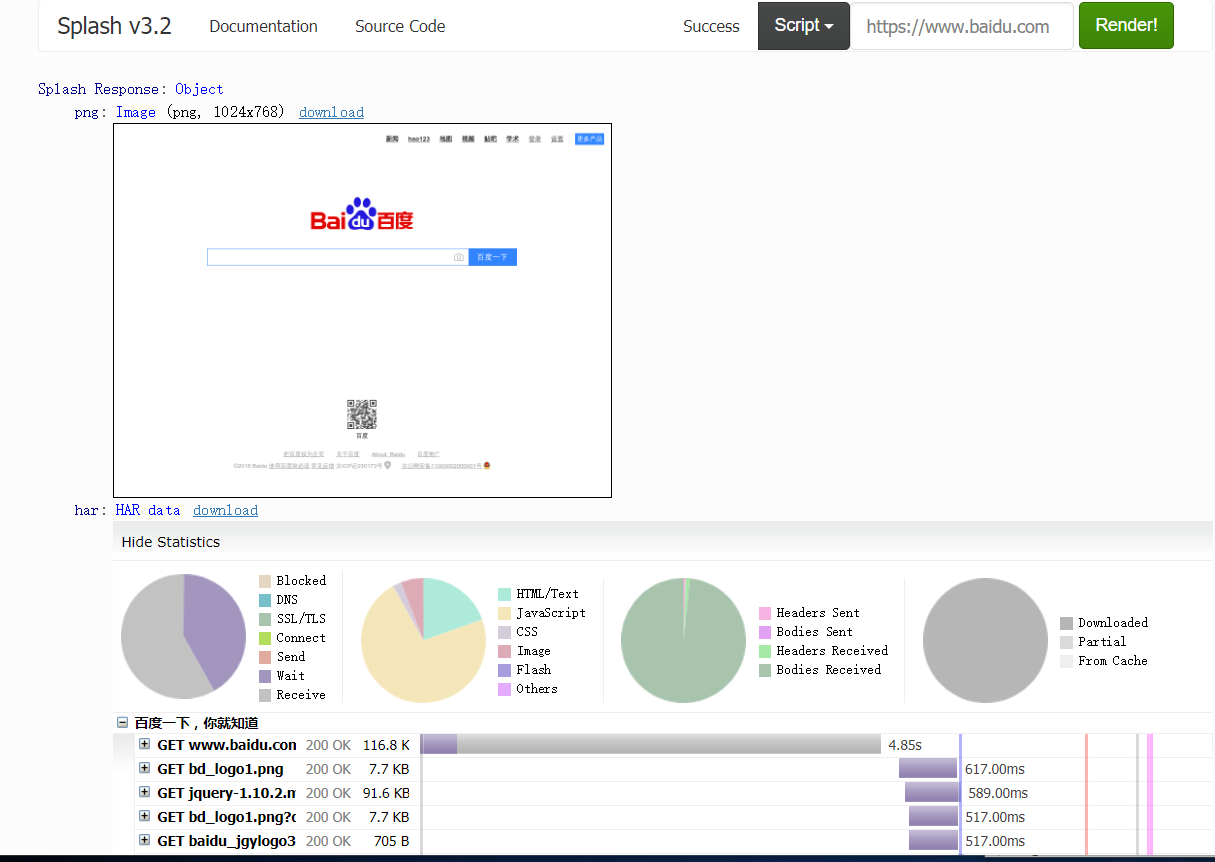
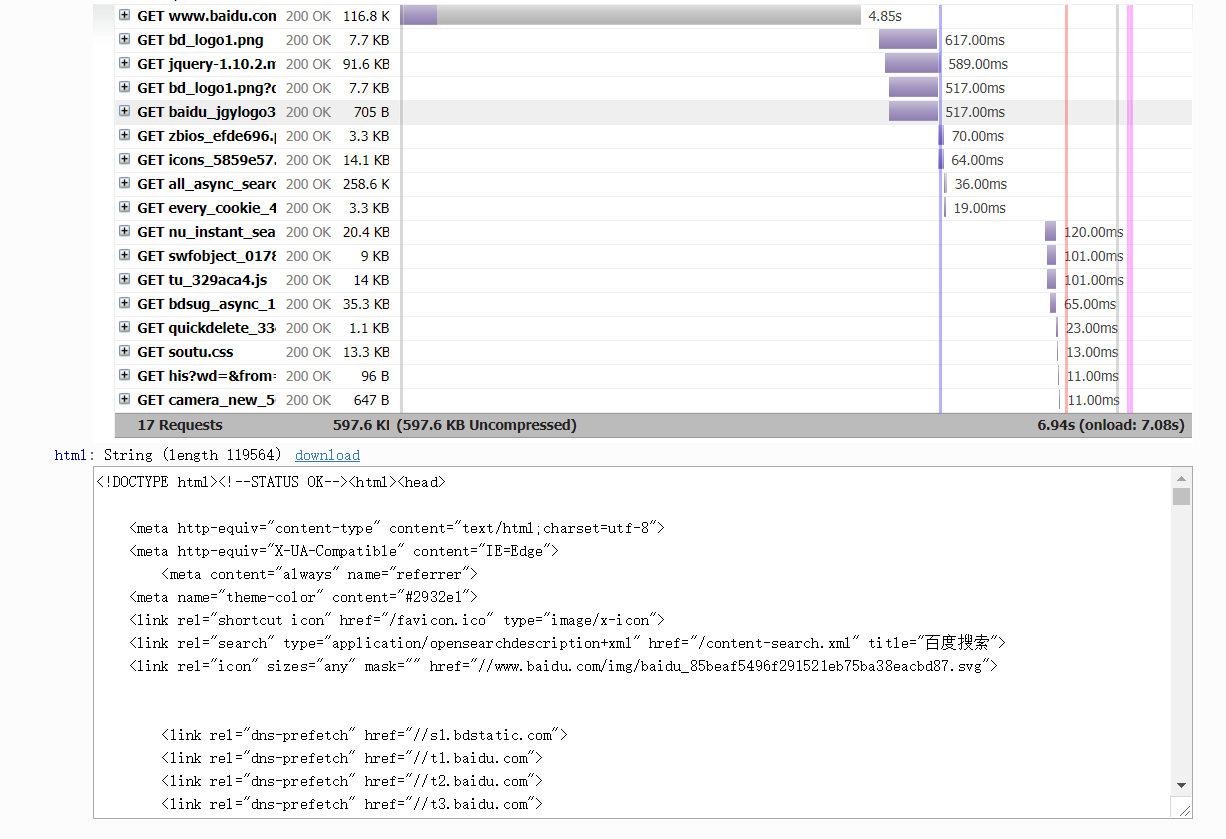
上面有个输入框,默认是http://google.com,我们可以换成想要渲染的网页如:https://www.baidu.com然后点击Render me按钮开始渲染,页面返回结果包括渲染截图、HAR加载统计数据、网页源代码:


从HAR中可以看到,Splash执行了整个页面的渲染过程,包括CSS、JavaScript的加载等,通过返回结果可以看到它分别对应搜索框下面的脚本文件中return部分的三个返回值,html、png、har:
function main(splash, args)
  assert(splash:go(args.url))
  assert(splash:wait(0.5))
  return {
    html = splash:html(),
    png = splash:png(),
    har = splash:har(),
  }
end
这个脚本是使用Lua语言写的,它首先使用go()方法加载页面,wait()方法等待加载时间,然后返回源码、截图和HAR信息。
现在我们修改下它的原脚本,访问www.baidu.com,通过javascript脚本,让它返回title,然后执行:
function main(splash, args)
assert(splash:go("https://www.baidu.com"))
assert(splash:wait(0.5))
local title = splash:evaljs("document.title")
return {
title = title
}
end

#返回结果:
Splash Response: Object

title: "百度一下,你就知道"
由此可以确定Splash渲染页面的过程是通过此入口脚本来实现的,那么我们可以修改此脚本来满足我们对抓取页面的分析和结果返回,但此函数但名称必须是main(),它返回的结果是一个字典形式也可以返回字符串形式的内容:
function main(splash)
  return {
    hello="world"
  }
end

#返回结果
Splash Response: Object
hello: "world"


function main(splash)
  return "world"
end

#返回结果
Splash Response: "world"
3、Splash对象的属性与方法
在前面的例子中,main()方法的第一参数是splash,这个对象它类似于selenium中的WebDriver对象,可以调用它的属性和方法来控制加载规程,下面介绍一些常用的属性:
splash.args:该属性可以获取加载时陪在的参数,如URL,如果为GET请求,它可以获取GET请求参数,如果为POST请求,它可以获取表单提交的数据,splash.args可以使用函数的第二个可选参数args来进行访问
function main(splash,args)
    local url = args.url
end

#上面的第二个参数args就相当于splash.args属性,如下代码与上面是等价的

function main(splash)
   local url=splash.args.url
end
splash.js_enabled:启用或者禁用页面中嵌入的JavaScript代码的执行,默认为true,启用JavaScript执行
splash.resource_timeout:设置网络请求的默认超时,以秒为单位,如设置为0或nil则表示无超时:splash.resource_timeout=nil
splash.images_enabled:启用或禁用图片加载,默认情况下是加载的:splash.images_enabled=true
splash.plugins_enabled:启用或禁用浏览器插件,默认为禁止:splash.plugins_enabled=false
splash.scroll_position:获取和设置主窗口的当前位置:splash.scroll_position={x=50,y=600}
function main(splash, args)
  assert(splash:go('https://www.toutiao.com'))
  splash.scroll_position={y=400}
  return {
    png = splash:png()
  }
end

#它会向下滚动400像素来获取图片
splash.html5_media_enabled:启用或禁用HTML5媒体,包括HTML5视频和音频(例如<video>元素播放)
splash对象的方法:
splash:go() :该方法用来请求某个链接,而且它可以模拟GET和POST请求,同时支持传入请求头,表单等数据,用法如下:
ok, reason = splash:go{url, baseurl=nil, headers=nil, http_method="GET", body=nil, formdata=nil}
参数说明:url为请求的URL,baseurl为可选参数表示资源加载相对路径,headers为可选参数,表示请求头,http_method表示http请求方法的字符串默认为GET,body为使用POST时发送表单数据,使用的Content-type为application/json,formdata默认为空,POST请求时的表单数据,使用的Content-type为application/x-www-form-urlencoded
该方法返回结果是ok和reason的组合,如果ok为空则代表网页加载错误,reason变量中会包含错误信息
function main(splash, args)
  local ok, reason = splash:go{"http://httpbin.org/post", http_method="POST", body="name=Germey"}
  if ok then
        return splash:html()
  end
end
splash.wait() :控制页面的等待时间
ok,reason=splash:wait{time,cancel_on_redirect=false,cancel_on_error=true}
tiem为等待的秒数,cancel_on_redirect表示发生重定向就停止等待,并返回重定向结果,默认为false,cancel_on_error默认为false,表示如果发生错误就停止等待
返回结果同样是ok和reason的组合
function main(splash, args)
  splash:go("https://www.toutiao.com")
  local ok reason = splash:wait(1)
  return {
    ok=ok,
    reason=reason
  }
end

#返回true说明返回页面成功
splash:jsfunc()
lua_func = splash:jsfunc(func)
此方法可以直接调用JavaScript定义的函数,但所调用的函数需要用双中括号包围,它相当于实现了JavaScript方法到Lua脚本到转换,全局的JavaScript函数可以直接包装
function main(splash, args)
  local get_div_count = splash:jsfunc([[
  function () {
    var body = document.body;
    var divs = body.getElementsByTagName('div');
    return divs.length;
  }
  ]])
  splash:go("https://www.baidu.com")
  return ("There are %s DIVs"):format(
    get_div_count())
end

#
Splash Response: "There are 21 DIVs"
splash.evaljs() :在页面上下文中执行JavaScript代码段并返回最后一个语句的结果
local title = splash:evaljs("document.title")

#返回页面标题
splash:runjs() :在页面上下文中运行JavaScript代码,同evaljs差不多,但它更偏向于执行某些动作或声明函数
function main(splash, args)
  splash:go("https://www.baidu.com")
  splash:runjs("foo = function() { return 'bar' }")
  local result = splash:evaljs("foo()")
  return result
end
splash:autoload() :将JavaScript设置为在每个页面加载时自动加载
ok,reason=splash:autoload{source_or_url,source=nil,url=nil}
参数:
- source_or_url - 包含JavaScript源代码的字符串或用于加载JavaScript代码的URL;s
- ource - 包含JavaScript源代码的字符串;
- url - 从中加载JavaScript源代码的URL
此方法只加载JavaScript代码或库,不执行操作,如果要执行操作可以调用evaljs()或runjs()方法
function main(splash, args)
  splash:autoload([[
    function get_document_title(){
      return document.title;
    }
  ]])
  splash:go("https://www.baidu.com")
  return splash:evaljs("get_document_title()")
end


#加载JS库文件
function main(splash, args)
  assert(splash:autoload("https://code.jquery.com/jquery-2.1.3.min.js"))
  assert(splash:go("https://www.taobao.com"))
  local version = splash:evaljs("$.fn.jquery")
  return 'JQuery version: ' .. version
end
splash:call_later :通过设置定时任务和延迟时间来实现任务延时执行
timer=splash:call_later(callback,delay) :callback运行的函数,delay延迟时间
function main(splash, args)
  local snapshots = {}
  local timer = splash:call_later(function()
    snapshots["a"] = splash:png()
    splash.scroll_position={y=500}
    splash:wait(1.0)
    snapshots["b"] = splash:png()
  end, 2)
  splash:go("https://www.toutiao.com")
  splash:wait(3.0)
  return snapshots
end

#等待2秒后执行截图然后再等待3秒后执行截图
splash:http_get() :发送HTTP GET请求并返回相应
response=splash:http_get{url,headers=nil,follow_redirects=true} :url要加载的URL,headers添加HTTP头,follw_redirects是否启动自动重定向默认为true
local reply = splash:http_get("http://example.com")

#返回一个响应对象,不会讲结果返回到浏览器
splash:http_post :发送POST请求
response = splash:http_post{url, headers=nil, follow_redirects=true, body=nil}
dody指定表单数据
function main(splash, args)
  local treat = require("treat")
  local json = require("json")
  local response = splash:http_post{"http://httpbin.org/post",
      body=json.encode({name="Germey"}),
      headers={["content-type"]="application/json"}
    }
    return {
    html=treat.as_string(response.body),
    url=response.url,
    status=response.status
    }
end

#
html:{"args":{},"data":"{\"name\": \"Germey\"}","files":{},"form":{},"headers":{"Accept-Encoding":"gzip, deflate","Accept-Language":"en,*","Connection":"close","Content-Length":"18","Content-Type":"application/json","Host":"httpbin.org","User-Agent":"Mozilla/5.0 (X11; Linux x86_64) AppleWebKit/602.1 (KHTML, like Gecko) splash Version/9.0 Safari/602.1"},"json":{"name":"Germey"},"origin":"221.218.181.223","url":"http://httpbin.org/post"}
status: 200
url: http://httpbin.org/post
splash:set_content() :设置当前页面的内容
ok,reason=splash:set_content{data,mime_type="text/html;charset=utf-8",baseurl=""}
function main(splash)
    assert(splash:set_content("<html><body><h1>hello</h1></body></html>"))
    return splash:png()
end
splash:html() :获取网页的源代码,结果为字符串
function main(splash, args)
  splash:go("https://httpbin.org/get")
  return splash:html()
end
splash:png() :获取PNG格式的网页截图
splash:jpeg() :获取JPEG格式的网页截图
splash:har() :获取页面加载过程描述
splash:url() :获取当前正在访问的URL
splash:get_cookies() :获取当前页面的cookies
splash:add_cookie() :为当前页面添加cookie
function main(splash)
    splash:add_cookie{"sessionid", "237465ghgfsd", "/", domain="http://example.com"}
    splash:go("http://example.com/")
    return splash:get_cookies()
end

#
Splash Response: Array[1]
0: Object
domain: "http://example.com"
httpOnly: false
name: "sessionid"
path: "/"
secure: false
value: "237465ghgfsd"
splash:clear_cookies() :清除所有的cookies
splash:delete_cookies{name=nil,url=nil} 删除指定的cookie
splash:get_viewport_size() :获取当前浏览器页面的大小,即宽高
splash:set_viewport_size(width,height) :设置当前浏览器页面的大小,即宽高
splash:set_viewport_full() :设置浏览器全屏显示
splash:set_user_agent() :覆盖设置请求头的User-Agent
splash:get_custom_headers(headers) :设置请求头
function main(splash)
  splash:set_custom_headers({
     ["User-Agent"] = "Mozilla/5.0 (Windows NT 10.0; Win64; x64) AppleWebKit/537.36 (KHTML, like Gecko) Chrome/67.0.3396.62 Safari/537.36",
     ["Site"] = "httpbin.org",
  })
  splash:go("http://httpbin.org/get")
  return splash:html()
end
splash:on_request(callback) :在HTTP请求之前注册要调用的函数
splash:get_version() :获取splash版本信息
splash:mouse_press() :触发鼠标按下事件
splash:mouse_release() :触发鼠标释放事件
splash:send_keys() :发送键盘事件到页面上下文,如发送回车键:splash:send_keys("key_Enter")
splash:send_text() :将文本内容发送到页面上下文
splash:select() :选中符合条件的第一个节点,如果有多个节点符合条件,则只会返回一个,其参数是CSS选择器
function main(splash)
  splash:go("https://www.baidu.com/")
  input = splash:select("#kw")
  input:send_text('Splash')
  splash:wait(3)
  return splash:png()
end
splash:select_all() :选中所有符合条件的节点,其参数是CSS选择器
function main(splash)
  local treat = require('treat')
  assert(splash:go("https://www.zhihu.com"))
  assert(splash:wait(1))
  local texts = splash:select_all('.ContentLayout-mainColumn .ContentItem-title')
  local results = {}
  for index, text in ipairs(texts) do
    results[index] = text.node.textContent
  end
  return treat.as_array(results)
end

#返回所有节点下的文本内容
splash:mouse_click() :出发鼠标单击事件
function main(splash)
  splash:go("https://www.baidu.com/")
  input = splash:select("#kw")
  input:send_text('Splash')
  submit = splash:select('#su')
  submit:mouse_click()
  splash:wait(3)
  return splash:png()
end
其他splash scripts的属性与方法请参考官方文档:http://splash.readthedocs.io/en/latest/scripting-ref.html
4、响应对象
响应对象是由splash方法返回的回调信息,如splash:http_get()或splash:http_post(),会被传递给回调splash:on_response和splash:on_response_headers,它们包括的响应信息:
response.url:响应的URL
response.status:响应的HTTP状态码
response.ok:成功返回true否则返回false
response.headers:返回HTTP头信息
response.info:具有HAR响应格式的响应数据表
response.body:返回原始响应主体信息为二进制对象,需要使用treat.as_string转换为字符串
resonse.request:响应的请求对象
response.abort:终止响应
5、元素对象
元素对象包装JavaScript DOM节点,创建某个方法返回任何类型的DOM节点,如Node,Element,HTMLElement等,splash:select和splash:select_all将返回元素对象
element:mouse_click() 出发元素上的鼠标单击事件
element:mouse_hover()在元素上触发鼠标悬停事件
elemnet:styles() 返回元素的计算样式
element:bounds() 返回元素的边界客户端矩形
element:png()以PNG格式返回元素的屏幕截图
element:jpeg() 以JPEG格式返回元素的屏幕截图
element:visible() 检查元素是否可见
element:focused() 检查元素是否具有焦点
element:text() 从元素中获取文本信息
element:info() 获取元素的详细信息
element:field_value() 获取field元素的值,如input,select,textarea,button
element:form_values(values='auto'/'list'/'first') 如果元素类型是表单,则返回带有表单的表,返回类型有三种格式
element:fill(values) 使用提供的值填写表单
element:send_keys(keys) 将键盘事件发送到元素,如发送回车send_keys('key_Enter'),其他键请参考:http://doc.qt.io/qt-5/qt.html
element:send_text() 发送字符串到元素
element:submit()提交表单元素
element:exists()检查DOM中元素是否存在
element属性:
element.node 它具有所有公开的元素DOM方法和属性,但不包括splash定义的方法和属性
element.inner_id 表示元素ID
外部继承的支持的DOM属性:(有一些是只读的)
从HTMLElement继承的属性:
- accessKey
- accessKeyLabel (read-only)
- contentEditable
- isContentEditable (read-only)
- dataset (read-only)
- dir
- draggable
- hidden
- lang
- offsetHeight (read-only)
- offsetLeft (read-only)
- offsetParent (read-only)
- offsetTop (read-only)
- spellcheck
- style - a table with styles which can be modified
- tabIndex
- title
- translate
从Element继承的属性:
- attributes (read-only) - a table with attributes of the element
- classList (read-only) - a table with class names of the element
- className
- clientHeight (read-only)
- clientLeft (read-only)
- clientTop (read-only)
- clientWidth (read-only)
- id
- innerHTML
- localeName (read-only)
- namespaceURI (read-only)
- nextElementSibling (read-only)
- outerHTML
- prefix (read-only)
- previousElementSibling (read-only)
- scrollHeight (read-only)
- scrollLeft
- scrollTop
- scrollWidth (read-only)
- tabStop
- tagName (read-only)
从Node继承的属性:
- baseURI (read-only)
- childNodes (read-only)
- firstChild (read-only)
- lastChild (read-only)
- nextSibling (read-only)
- nodeName (read-only)
- nodeType (read-only)
- nodeValue
- ownerDocument (read-only)
- parentNode (read-only)
- parentElement (read-only)
- previousSibling (read-only)
- rootNode (read-only)
- textContent
6、Splash HTTP API调用
Splash通过HTTP API控制来发送GET请求或POST表单数据,它提供了这些接口,只需要在请求时传递相应的参数即可获得不同的内容,下面来介绍下这些接口
(1)render.html 它返回JavaScript渲染页面的HTML代码
参数:
url:要渲染的网址,str类型
baseurl:用于呈现页面的基本URL
timeout:渲染的超时时间默认为30秒
resource_timeout:单个网络请求的超时时间
wait:加载页面后等待更新的时间默认为0
proxy:代理配置文件名称或代理URL,格式为:[protocol://][user:password@]proxyhost[:port])
js:JavaScript配置
js_source:在页面中执行的JavaScript代码
filtrs:以逗号分隔的请求过滤器名称列表
allowed_domains:允许的域名列表
images:为1时下载图像,为0时不下载图像,默认为1
headers:设置的HTTP标头,JSON数组
body:发送POST请求的数据
http_method:HTTP方法,默认为GET
html5_media:是否启用HTML5媒体,值为1启用,0为禁用,默认为0
import requests
url='http://172.16.32.136:8050/'
response=requests.get(url+'render.html?url=https://www.baidu.com&wait=3&images=0')
print(response.text)  #返回网页源代码
(2)render.png 此接口获取网页的截图PNG格式
import requests
url='http://172.16.32.136:8050/'
#指定图像宽和高
response=requests.get(url+'render.png?url=https://www.taobao.com&wait=5&width=1000&height=700&render_all=1')
with open('taobao.png','wb') as f:
    f.write(response.content)
(3)render.jpeg 返回JPEG格式截图
import requests
url='http://172.16.32.136:8050/'

response=requests.get(url+'render.jpeg?url=https://www.taobao.com&wait=5&width=1000&height=700&render_all=1')
with open('taobao.jpeg','wb') as f:
    f.write(response.content)
(4)render.har 此接口用于获取页面加载的HAR数据
import requests
url='http://172.16.32.136:8050/'
response=requests.get(url+'render.har?url=https://www.jd.com&wait=5')

print(response.text)
(5)render.json 此接口包含了前面接口的所有功能,返回结果是JSON格式
参数:
html:是否在输出中包含HTML,html=1时包含html内容,为0时不包含,默认为0
png:是否包含PNG截图,为1包含为0不包含默认为0
jpeg:是否包含JPEG截图,为1包含为0不包含默认为0
iframes:是否在输出中包含子帧的信息,默认为0
script:是否输出包含执行的JavaScript语句的结果
console:是否输出中包含已执行的JavaScript控制台消息
history:是否包含网页主框架的请求与响应的历史记录
har:是否输出中包含HAR信息
import requests
url='http://172.16.32.136:8050/'
response=requests.get(url+'render.json?url=https://httpbin.org&html=1&png=1&history=1&har=1')

print(response.text)
(6)execute 用此接口可以实现与Lua脚本的对接,它可以实现与页面的交互操作
参数:
lua_source:Lua脚本文件
timeout:设置超时
allowed_domains:指定允许的域名列表
proxy:指定代理
filters:指定筛选条件
import requests
from urllib.parse import quote
lua='''
function main(splash)
    return 'hello'
end
'''
url='http://172.16.32.136:8050/execute?lua_source='+quote(lua)
response=requests.get(url)
print(response.text)
通过Lua脚本获取页面的body,url和状态码:
import requests
from urllib.parse import quote
lua='''
function main(splash,args)
    local treat=require("treat")
    local response=splash:http_get("http://httpbin.org/get")
    return {
        html=treat.as_string(response.body),
        url=response.url,
        status=response.status
    }
end
'''
url='http://172.16.32.136:8050/execute?lua_source='+quote(lua)
response=requests.get(url)
print(response.text)

#
{"status": 200, "html": "{\"args\":{},\"headers\":{\"Accept-Encoding\":\"gzip, deflate\",\"Accept-Language\":\"en,*\",\"Connection\":\"close\",\"Host\":\"httpbin.org\",\"User-Agent\":\"Mozilla/5.0 (X11; Linux x86_64) AppleWebKit/602.1 (KHTML, like Gecko) splash Version/9.0 Safari/602.1\"},\"origin\":\"221.218.181.223\",\"url\":\"http://httpbin.org/get\"}\n", "url": http://httpbin.org/get}
7、实例
抓取JD python书籍数据:
#!/usr/bin/env python
# -*- coding: utf-8 -*-
# @Time    : 2018/7/9 13:33
# @Author  : Py.qi
# @File    : JD.py
# @Software: PyCharm
import re

import requests
import pymongo
from pyquery import PyQuery as pq

client=pymongo.MongoClient('localhost',port=27017)
db=client['JD']

def page_parse(html):
    doc=pq(html,parser='html')
    items=doc('#J_goodsList .gl-item').items()
    for item in items:
        if item('.p-img img').attr('src'):
            image=item('.p-img img').attr('src')
        else:
            image=item('.p-img img').attr('data-lazy-img')
        texts={
            'image':'https:'+image,
            'price':item('.p-price').text()[:6],
            'title':re.sub('\n','',item('.p-name').text()),
            'commit':item('.p-commit').text()[:-3],

        }
        yield texts

def save_to_mongo(data):
    if db['jd_collection'].insert(data):
        print('保存到MongoDB成功',data)
    else:
        print('MongoDB存储错误',data)

def main(number):
    url='http://192.168.146.140:8050/render.html?url=https://search.jd.com/Search?keyword=python&page={}&wait=1&images=0'.format(number)
    response=requests.get(url)
    data=page_parse(response.text)
    for i in data:
        save_to_mongo(i)
        #print(i)

if __name__ == '__main__':
    for number in range(1,200,2):
        print('开始抓取第{}页'.format(number))
        main(number)
更多内容请查看官方文档:http://splash.readthedocs.io/en/stable/
到此这篇关于python3之Splash的具体使用的文章就介绍到这了,更多相关python3 Splash内容请搜索hwidc以前的文章或继续浏览下面的相关文章希望大家以后多多支持hwidc!
【原创作者:http://www.1234xp.com/jap.html 转载请说明出处】