vue+element+springboot实现文件下载进度条展现功能示
目录
- 1. 需求背景
- 2. 优化方案
- 3. 具体实现
- 3.1 前端代码
- 3.2 后台代码
- 4. 总结
本文主要介绍了vue+element+springboot实现文件下载进度条展现功能示例,分享给大家,具体如下
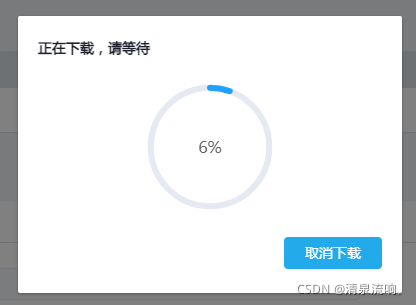
最终效果图

1. 需求背景
最近接到一个优化需求,原系统文件下载功能体验不友好,特别是下载一些比较耗时的文件,用户在页面上傻等不知道下载的进度是怎么样的,总以为是系统卡死了。
2. 优化方案
后台优化下载速度(可以研究一下分片下载,这里不做展开)
改造前端用户体验(比如点击下载后你要显示出来进度,让客户知道已经在下载中了)
3. 具体实现
这里选择了2.2中的方案,改造前端用户体验,写这篇文章的目的是记录当时的解决过程,希望能帮到大家;本文使用的方案技术背景:前端 vue + element-ui,后台:springboot 前后端分离,废话不多说,直接上代码;
3.1 前端代码
1.定义一个弹出层(样式各位看官根据自己的喜好来)
<!--下载进度条-->
    <el-dialog title="正在下载,请等待" :visible.sync="fileDown.loadDialogStatus" :close-on-click-modal="false"
      :close-on-press-escape="false" :show-close="false" width="20%">
      <div style="text-align: center;">
        <el-progress type="circle" :percentage="fileDown.percentage"></el-progress>
      </div>
      <div slot="footer" class="dialog-footer">
        <el-button type="primary" @click="downClose">取消下载</el-button>
      </div>
    </el-dialog>
在data()中定义一个对象
fileDown: {
        loadDialogStatus: false, //弹出框控制的状态
        percentage: 0, //进度条的百分比
        source: {}, //取消下载时的资源对象
      },
3.主要方法(注意替换下面的参数,后台地址、文件名等)
downFile(row) {
    //这里放参数
    var param = {};
    this.fileDown.loadDialogStatus = true;
    this.fileDown.percentage = 0;
    const instance = this.initInstance();
    instance({
        method: "post",
        withCredentials: true,
        url: "替换下载地址",
        params: param,
        responseType: "blob"
    }).then(res => {
        this.fileDown.loadDialogStatus = false;
        console.info(res);
        const content = res.data;
        if (content.size == 0) {
          this.loadClose();
          this.$alert("下载失败");
          return ;
        }
        const blob = new Blob([content]);
        const fileName = row.fileName;//替换文件名
        if ("download" in document.createElement("a")) {
          // 非IE下载
          const elink = document.createElement("a");
          elink.download = fileName;
          elink.style.display = "none";
          elink.href = URL.createObjectURL(blob);
          document.body.appendChild(elink);
          elink.click();
          setTimeout(function() {
            URL.revokeObjectURL(elink.href); // 释放URL 对象
            document.body.removeChild(elink);
          }, 100);
        } else {
          // IE10+下载
          navigator.msSaveBlob(blob, fileName);
        }
      }).catch(error => {
          this.fileDown.loadDialogStatus = false;
          console.info(error);
      });
  },
initInstance() {
      var _this = this;
      //取消时的资源标记
      this.fileDown.source = axios.CancelToken.source();
      const instance = axios.create({ //axios 这个对象要提前导入 或者替换为你们全局定义的
        onDownloadProgress: function(ProgressEvent) {
          const load = ProgressEvent.loaded;
          const total = ProgressEvent.total;
          const progress = (load / total) * 100;
          console.log('progress='+progress);
          //一开始已经在计算了 这里要超过先前的计算才能继续往下
          if (progress > _this.fileDown.percentage) {
            _this.fileDown.percentage = Math.floor(progress);
          }
          if(progress == 100){
            //下载完成
            _this.fileDown.loadDialogStatus = false;
          }
        },
        cancelToken: this.fileDown.source.token,//声明一个取消请求token
      });
      return instance;
    },
    downClose() {
      //中断下载
      this.$confirm("点击关闭后将中断下载,是否确定关闭?", this.$t("button.tip"), {
        confirmButtonText: this.$t("button.confirm"),
        cancelButtonText: this.$t("button.cancel"),
        type: "warning"
      }).then(() => {
          //中断下载回调
          this.fileDown.source.cancel('log==客户手动取消下载');
      }).catch(() => {
          //取消--什么都不做
      });
    },
3.2 后台代码
后台主要是要返回计算好的文件大小,否则上面前端计算进度的时候取的total永远是0,这个就是一个隐藏的坑。
关键代码:(下载完整后台网上其实有很多,这里只是列出关键的和需要注意的点)
//获取本地文件 并计算大小
File file = new File(zipFileName);//读取压缩文件
InputStream inputStream = new FileInputStream(file);
int totalSize = inputStream.available(); //获取文件大小
logger.info("压缩后===当前文件下载大小size={}", totalSize);
response.setHeader("Content-Length", totalSize+"");//这里注意 一定要在response.getOutputStream()之前就把这个setHeader属性设进去,否则也不生效
OutputStream out = response.getOutputStream();
后续省略.....
4. 总结
可能大家在使用过程中还会遇到一个问题,就是后端计算文件大小的时候花很多时间,导致前端也是半天进度条不动,用户还是会觉得卡了,这样就达不到我们的诉求了;
这里我这边的解决方案是,前端做一个定时器,点击下载的时候,定时器先跑,比如2秒增加1%的进度,等到后台返回文件总大小的时候,计算出来的百分比(percentage)超过定时器走的百分比(percentage)的时候就关掉定时器,并替换那个进度百分比的属性(percentage);记住一点,这个定时器自动加百分比(percentage)一定要设一个上限。
好处是用户一点下载按钮,前端就给出反应,虽然前面的反应可能是假的,但是只要衔接好了,真假就无所谓了
到此这篇关于vue+element+springboot实现文件下载进度条展现功能示例的文章就介绍到这了,更多相关element springboot 下载进度条 内容请搜索海外IDC网以前的文章或继续浏览下面的相关文章希望大家以后多多支持海外IDC网!
【本文由http://www.1234xp.com/xgzq.html首发,转载请保留出处,谢谢】