手摸手教你实现Vue3 Reactivity
目录
- 前言
- 开始
- 小小思考
- 代码实现
- 模仿
- 实现track
- 实现trigger
- 实现observe
- 实现computed
前言
Vue3的响应式基于Proxy,对比Vue2中使用的Object.definedProperty的方式,使用Proxy在新增的对象以及数组的拦截上都有很好的支持。
Vue3的响应式是一个独立的系统,可以抽离出来使用,那他到底是如何实现的呢?
都知道有Getter和Setter,那Getter和Setter中分别都进行了哪些主要操作才能实现响应式呢?
哼哼,带着这些问题一起来看看吧,文章会一步一步实现一个完整的响应式系统(误)~。
开始
observer-util这个库使用了与Vue3同样的思路编写,Vue3中的实现更加复杂,从一个更加纯粹的库开始(我不会承认是因为Vue3中有些未看懂的,不会)。
根据官网的例子:
import { observable, observe } from '@nx-js/observer-util';

const counter = observable({ num: 0 });
const countLogger = observe(() => console.log(counter.num));

// this calls countLogger and logs 1
counter.num++;
这两个类似Vue3里的reactive和普通的响应式。
observable之后的对象被添加了代理,之后observe中添加的响应函数会在依赖的属性改变时调用一次。
小小思考
这里粗略思考是一个订阅发布的模型,被observable代理之后的对象建立一个发布者仓库,observe这时候会订阅counter.num,之后订阅的内容改变时便会一一回调。
伪代码:
// 添加监听
xxx.addEventListener('counter.num', () => console.log(counter.num))
// 改变内容
counter.num++
// 发送通知
xxx.emit('counter.num', counter.num)
而响应式的核心也就是这个,添加监听与发送通知会经由observable和observe自动完成。
代码实现
经由上面的思考,在Getter里我们需要将observe传过来的回调添加到订阅仓库中。
具体的实现中observable会为这个观察的对象添加一个handler,在Getter的handler中有一个
registerRunningReactionForOperation({ target, key, receiver, type: 'get' })
const connectionStore = new WeakMap()
// reactions can call each other and form a call stack
const reactionStack = []

// register the currently running reaction to be queued again on obj.key mutations
export function registerRunningReactionForOperation (operation) {
  // get the current reaction from the top of the stack
  const runningReaction = reactionStack[reactionStack.length - 1]
  if (runningReaction) {
    debugOperation(runningReaction, operation)
    registerReactionForOperation(runningReaction, operation)
  }
}
这个函数会获取出一个reaction(也就是observe传过来的回调),并且通过registerReactionForOperation保存。
export function registerReactionForOperation (reaction, { target, key, type }) {
  if (type === 'iterate') {
    key = ITERATION_KEY
  }

  const reactionsForObj = connectionStore.get(target)
  let reactionsForKey = reactionsForObj.get(key)
  if (!reactionsForKey) {
    reactionsForKey = new Set()
    reactionsForObj.set(key, reactionsForKey)
  }
  // save the fact that the key is used by the reaction during its current run
  if (!reactionsForKey.has(reaction)) {
    reactionsForKey.add(reaction)
    reaction.cleaners.push(reactionsForKey)
  }
}
这里生成了一个Set,根据key,也就是实际业务中get时候的key,将这个reaction添加进Set中,整个的结构是这样的:
connectionStore<weakMap>: {
    // target eg: {num: 1}
    target: <Map>{
        num: (reaction1, reaction2...)
    }
}
注意这里的reaction,const runningReaction = reactionStack[reactionStack.length - 1] 通过全局变量reactionStack获取到的。
export function observe (fn, options = {}) {
  // wrap the passed function in a reaction, if it is not already one
  const reaction = fn[IS_REACTION]
    ? fn
    : function reaction () {
      return runAsReaction(reaction, fn, this, arguments)
    }
  // save the scheduler and debugger on the reaction
  reaction.scheduler = options.scheduler
  reaction.debugger = options.debugger
  // save the fact that this is a reaction
  reaction[IS_REACTION] = true
  // run the reaction once if it is not a lazy one
  if (!options.lazy) {
    reaction()
  }
  return reaction
}

export function runAsReaction (reaction, fn, context, args) {
  // do not build reactive relations, if the reaction is unobserved
  if (reaction.unobserved) {
    return Reflect.apply(fn, context, args)
  }

  // only run the reaction if it is not already in the reaction stack
  // TODO: improve this to allow explicitly recursive reactions
  if (reactionStack.indexOf(reaction) === -1) {
    // release the (obj -> key -> reactions) connections
    // and reset the cleaner connections
    releaseReaction(reaction)

    try {
      // set the reaction as the currently running one
      // this is required so that we can create (observable.prop -> reaction) pairs in the get trap
      reactionStack.push(reaction)
      return Reflect.apply(fn, context, args)
    } finally {
      // always remove the currently running flag from the reaction when it stops execution
      reactionStack.pop()
    }
  }
}
在runAsReaction中,会将传入的reaction(也就是上面的const reaction = function() { runAsReaction(reaction) })执行自己的包裹函数压入栈中,并且执行fn,这里的fn即我们想自动响应的函数,执行这个函数自然会触发get,此时的reactionStack中则会存在这个reaction。这里注意fn如果里面有异步代码的情况,try finally的执行顺序是这样的:
// 执行try的内容,
// 如果有return执行return内容,但不会返回,执行finally后返回,这里面不会阻塞。

function test() {
    try {
        console.log(1);
        const s = () => { console.log(2); return 4; };
        return s();
    } finally {
        console.log(3)
    }
}

// 1 2 3 4
console.log(test())
所以如果异步代码阻塞并且先于Getter执行,那么就不会收集到这个依赖。
模仿
目标实现observable和observe以及衍生出来的Vue中的computed。
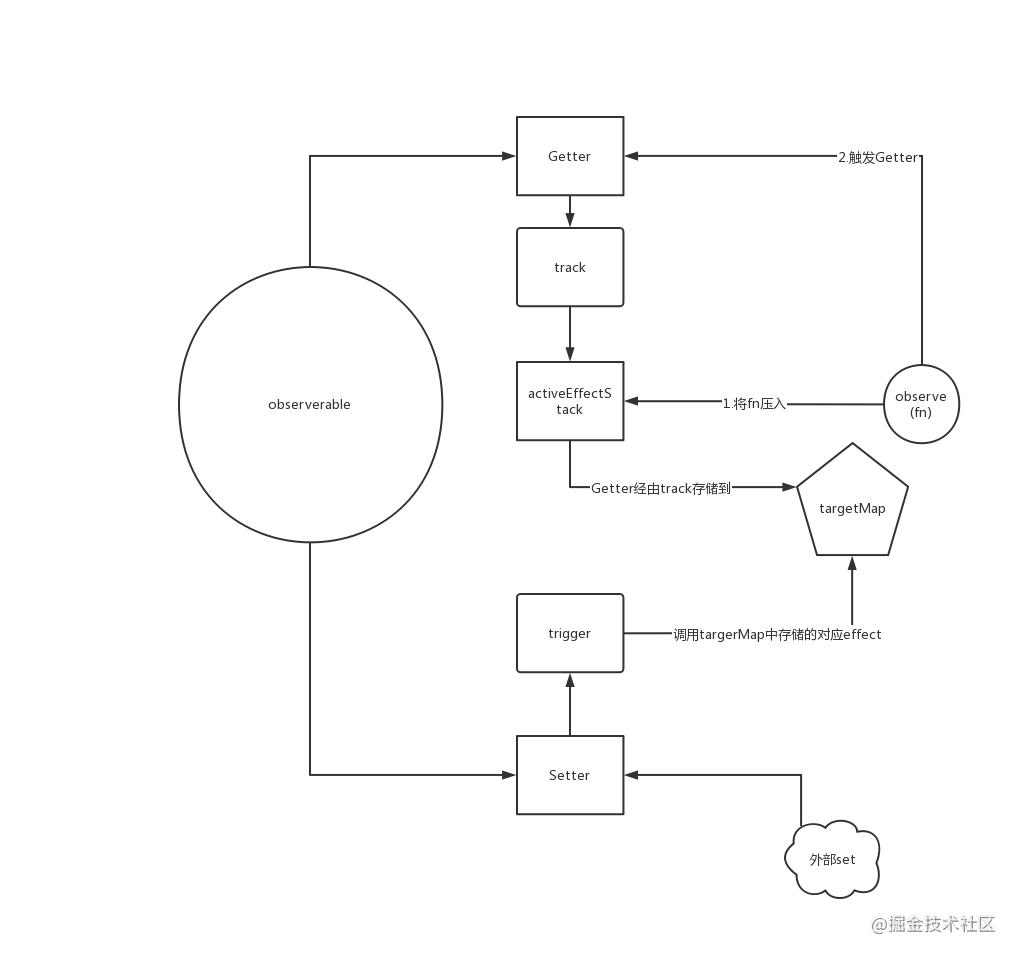
借用Vue3的思路,get时的操作称为track,set时的操作称为trigger,回调称为effect。
先来个导图:

function createObserve(obj)  {

    let handler = {
        get: function (target, key, receiver) {
            let result = Reflect.get(target, key, receiver)
            track(target, key, receiver)
            return result
        },
        set: function (target, key, value, receiver) {
            let result = Reflect.set(target, key, value, receiver)
            trigger(target, key, value, receiver)
            return result
        }
    }

    let proxyObj = new Proxy(obj, handler)

    return proxyObj
}

function observable(obj) {
    return createObserve(obj)
}
这里我们只作了一层Proxy封装,像Vue中应该会做一个递归的封装。
区别是只做一层封装的话只能检测到外层的=操作,内层的如Array.push,或者嵌套的替换等都是无法经过set和get的。
实现track
在track中我们会将当前触发的effect也就是observe的内容或者其他内容压入关系链中,以便trigger时可以调用到这个effect。
const targetMap = new WeakMap()
let activeEffectStack = []
let activeEffect

function track(target, key, receiver?) {
    let depMap = targetMap.get(target)

    if (!depMap) {
        targetMap.set(target, (depMap = new Map()))
    }

    let dep = depMap.get(key)

    if (!dep) {
        depMap.set(key, ( dep = new Set() ))
    }

    if (!dep.has(activeEffect)) {
        dep.add(activeEffect)
    }
}
targetMap是一个weakMap,使用weakMap的好处是当我们observable的对象不存在其他引用的时候会正确的被垃圾回收掉,这一条链是我们额外建立的内容,原对象不存在的情况下不应该在继续存在。
这里面最终会形成一个:
targetMap = {
    <Proxy 或者 Object>observeable: <Map>{
        <observeable中的某一个key>key: ( observe, observe, observe... )
    }
}
activeEffectStack和activeEffect是两个用于数据交换的全局变量,我们在get中会把当前的activeEffect添加到get的key的生成的Set中保存起来,让set操作可以拿到这个activeEffect然后再次调用,实现响应式。
实现trigger
function trigger(target, key, value, receiver?) {
    let depMap = targetMap.get(target)

    if (!de【文章出处http://www.1234xp.com/yz.html 欢迎转载】pMap) {
        return
    }

    let dep = depMap.get(key)

    if (!dep) {
        return
    }

    dep.forEach((item) => item && item())
}
trigger这里按照思路实现一个最小的内容,只是将get中添加的effect逐个调用。
实现observe
根据导图,在observe中我们需要将传入的function压入activeEffectStack并调用一次function触发get。
function observe(fn:Function) {
    const wrapFn = () => {

        const reaction = () => {
            try {
                activeEffect = fn
                activeEffectStack.push(fn)
                return fn()
            } finally {
                activeEffectStack.pop()
                activeEffect = activeEffectStack[activeEffectStack.length-1]
            }
        }

        return reaction()
    }

    wrapFn()

    return wrapFn
}
function有可能出错,finally中的代码保证activeEffectStack中对应的那个会被正确删除。
测试
let p = observable({num: 0})
let j = observe(() => {console.log("i am observe:", p.num);)
let e = observe(() => {console.log("i am observe2:", p.num)})

// i am observe: 1
// i am observe2: 1
p.num++
实现computed
在Vue中一个很有用的东西是计算属性(computed),它是依赖于其他属性而生成的新值,会在它依赖的其他值更改时自动更改。
我们在实现了ovserve之后computed就实现了一大半。
class computedImpl {
    private _value
    private _setter
    private effect

    constructor(options) {
        this._value = undefined
        this._setter = undefined
        const { get, set } = options
        this._setter = set

        this.effect = observe(() => {
            this._value = get()
        })
    }

    get value() {
        return this._value
    }

    set value (val) {
        this._setter && this._setter(val)
    }
}

function computed(fnOrOptions) {

    let options = {
        get: null,
        set: null
    }

    if (fnOrOptions instanceof Function) {
        options.get = fnOrOptions
    } else {
        const { get, set } = fnOrOptions
        options.get= get
        options.set = set
    }

    return new computedImpl(options)
}
computed有两种方式,一种是computed(function)这样会当做get,另外还可以设置setter,setter更多的像是一个回调可以和依赖的其他属性完全没有关系。
let p = observable({num: 0})
let j = observe(() => {console.log("i am observe:", p.num); return `i am observe: ${p.num}`})
let e = observe(() => {console.log("i am observe2:", p.num)})
let w = computed(() => { return '我是computed 1:' + p.num })
let v = computed({
    get: () => {
        return 'test computed getter' + p.num
    },

    set: (val) => {
        p.num = `test computed setter${val}`
    }
})

p.num++
// i am observe: 0
// i am observe2: 0
// i am observe: 1
// i am observe2: 1
// 我是computed 1:1
console.log(w.value)
v.value = 3000
console.log(w.value)
// i am observe: test computed setter3000
// i am observe2: test computed setter3000
// 我是computed 1:test computed setter3000
w.value = 1000
// 并没有为w设置setter所以并没有生效
// 我是computed 1:test computed setter3000
console.log(w.value)
到此这篇关于手摸手教你实现Vue3 Reactivity的文章就介绍到这了,更多相关Vue3 Reactivity内容请搜索hwidc以前的文章或继续浏览下面的相关文章希望大家以后多多支持hwidc!
