详解在DevExpress程序中使用TreeList控件以及节点查
在很多情况下,我们需要通过树列表进行数据的展示,如一些有层次关系的数据,通过有层级的展示,能够使用户更加直观查看和管理相关的数据。在一般Winform开发的情况下,可以使用微软的TreeView控件,也可以使用DevExpress的TreeList控件进行数据的展示,本篇随笔主要介绍基于DevExpress的TreeList控件使用以及使用SearchControl对节点进行查询的操作。
1、 使用微软的TreeView控件的实现效果和思路
在很多情况下,我们也倾向于使用TreeView控件作为数据的展示,相对于TreeList控件,这种控件的处理,需要自己管理树节点的层次关系,不过使用也比较简单,呈现的效果两者都差别不大。
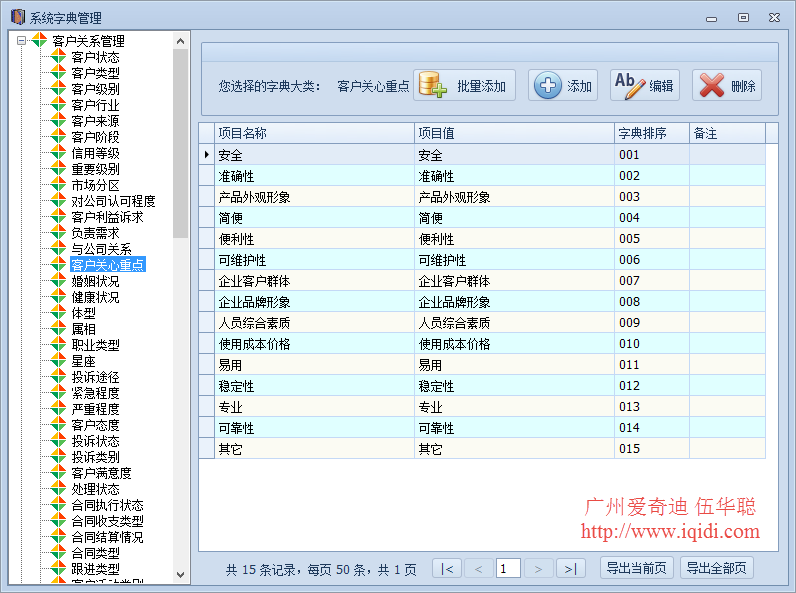
如在我开发框架中,在字典管理模块里面,就是采用这个控件进行数据的展示的,整体效果也还不错。

在树形列表里面,我们获取数据后,统一根据层级的关系构建树节点即可,如下代码所示。
/// <summary>
/// 初始化树信息
/// </summary>
private void InitTreeView()
{
  this.treeView1.Nodes.Clear();
  this.treeView1.BeginUpdate();
  List<DictTypeNodeInfo> typeNodeList = BLLFactory<DictType>.Instance.GetTree();
  foreach (DictTypeNodeInfo info in typeNodeList)
  {
    AddTree(null, info);
  }
  this.treeView1.EndUpdate();
  this.treeView1.ExpandAll();
}
/// <summary>
/// 根据节点数据,递归构建该层级以下的树节点
/// </summary>
/// <param name="pNode">父树节点</param>
/// <param name="info">字典类型数据</param>
private void AddTree(TreeNode pNode, DictTypeNodeInfo info)
{
  TreeNode node = null;
  if (info.PID == "-1")
  {
    node = new TreeNode(info.Name, 0, 0);
    node.Tag = info.ID;
    this.treeView1.Nodes.Add(node);
  }
  else
  {
    node = new TreeNode(info.Name, 1, 1);
    node.Tag = info.ID;
    pNode.Nodes.Add(node);
  }
  foreach (DictTypeNodeInfo subInfo in info.Children)
  {
    AddTree(node, subInfo);
  }
}
还有我们在鼠标选择某个节点的时候,触发AfterSelect事件,这样我们就可以处理鼠标节点的事件了
/// <summary>
/// 单击节点事件处理
/// </summary>
private void treeView1_AfterSelect(object sender, TreeViewEventArgs e)
{
  if (e.Node.Tag != null)
  {
    this.lblDictType.Text = e.Node.Text;
    this.lblDictType.Tag = e.Node.Tag;
    BindData();
  }
}
以上就是使用TreeView控件来处理数据的展示,从上面代码可以看到,整体的内容,主要是通过递归的关系来构建TreeNode的处理,但是使用的代码也不算复杂,因此大多数可以采用这种方式来自定义树形节点的展示。
2、使用DevExpress的TreeList控件的效果和实现代码
而使用DevExpress的TeeList控件,可以通过KeyFieldName和ParentFieldName指定他们的层级关系,使用就更加简单化,提供的数据源会自动进行层次的关系处理,非常方便。
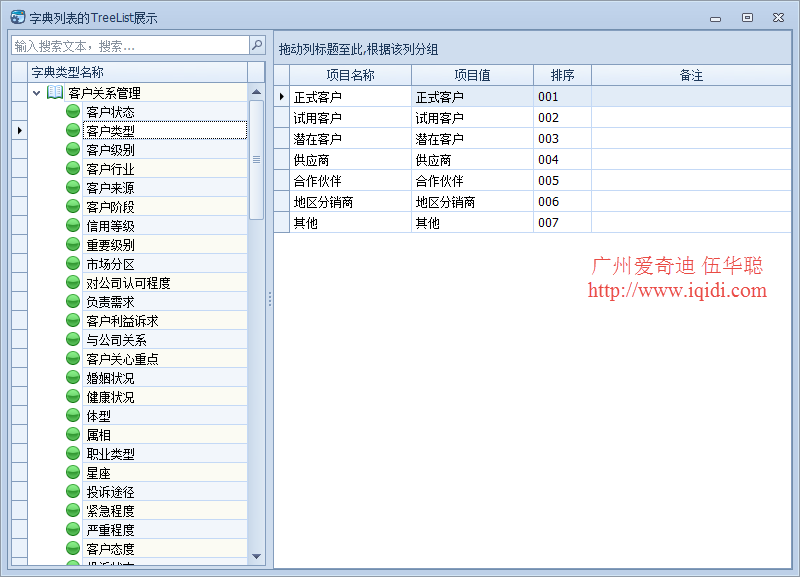
我们先来看看通过DevExpress的TreeList控件展示的字典类型和字典数据的界面效果。

这里面的效果是如何通过代码实现的呢?
首先我们使用代码获取字典类型数据并进行树列表控件的初始化操作,如下所示。
//添加显示列
this.tree.Columns.Add(new TreeListColumn{ FieldName= "Name", Caption= "字典类型名称", Width=160, VisibleIndex =0});
//设置树控件的层次关系及属性
tree.KeyFieldName = "ID";
tree.ParentFieldName = "PID";
this.tree.OptionsBehavior.Editable = false;
this.tree.OptionsView.EnableAppearanceOddRow = true;
this.tree.OptionsView.EnableAppearanceEvenRow = true;
上面的代码我们还可以通过扩展函数对树列表的处理进行封装,已达到简化代码的目的,如下是处理后的实现代码:
//控件扩展函数封装处理
this.tree.CreateColumn("Name", "字典类型名称", 160, true)【文章来源:http://www.1234xp.com/mggfzq.html网络转载请说明出处】;
this.tree.InitTree("ID", "PID", "-1", false, false);
通过添加TreeListColumn对象给TreeList控件就可以实现字段列的显示了,同时指定数据源里面的KeyFieldName和ParentFieldName来设定层级关系即可,非常简单。
而绑定数据源,则可以通过一个函数进行处理,如下所示。
/// <summary>
/// 绑定树的数据源
/// </summary>
private void BindTree()
{
  this.tree.DataSource = BLLFactory<DictType>.Instance.GetAll();
  this.tree.ExpandAll();
}
从上面代码我们可以看到,我们返回的数据源,不需要在实体类对象层级具有上下级的关系,如通过TreeView实现的时候,我们使用了DictTypeNodeInfo 对象是具有上下层级关系的。
这里只需要使用普通的DictTypeInfo 对象集合即可,通过KeyFieldName和ParentFieldName来设定层级关系即可。
为了指定树形节点的图标,我们可以通过代码进行自定义图标的处理,如下代码所示,这样每个层级的图标都不一样,自动实现获取设置的处理。
//设置树的图标集合及逐级图标
this.tree.SelectImageList = this.imageCollection1;
this.tree.CustomDrawNodeImages += (object sender, CustomDrawNodeImagesEventArgs e)=>
{
  int maxCount = this.imageCollection1.Images.Count;
  var index = e.Node.Level < maxCount ? e.Node.Level : 0;
  e.SelectImageIndex = index;
};
实现树节点选中的事件处理,则需要实现FocusedNodeChanged事件即可。
//初始化树节点选择事件
  this.tree.FocusedNodeChanged += delegate(object sender, FocusedNodeChangedEventArgs e)
  {
    this.FocusedNodeChanged();
  };
}
private void FocusedNodeChanged()
{
  if (this.tree.FocusedNode != null)
  {
    var PID = string.Concat(this.tree.FocusedNode.GetValue("ID"));
    treeConditionSql = string.Format("DictType_ID = '{0}'", PID);
  }
  else
  {
    treeConditionSql = "";
  }
  BindData();
}
最后初始化树列表的代码如下所示。
private void InitTree()
{
  this.tree.Columns.Clear();
  //控件扩展函数封装处理
  this.tree.CreateColumn("Name", "字典类型名称", 160, true);
  this.tree.InitTree("ID", "PID", "-1", false, false);
  //设置树的图标集合及逐级图标
  this.tree.SelectImageList = this.imageCollection1;
  this.tree.CustomDrawNodeImages += (object sender, CustomDrawNodeImagesEventArgs e)=>
  {
    int maxCount = this.imageCollection1.Images.Count;
    var index = e.Node.Level < maxCount ? e.Node.Level : 0;
    e.SelectImageIndex = index;
  };
}
3、基于SearchControl控件对节点进行查询的操作
上面的处理就是树列表的一般性展示,如果需要在树节点上面增加一个查询过滤的操作,那么可以使用SearchControl控件进行过滤处理,只需要设置SearchControl控件的Client属性,以及实现树控件的FilterNode事件即可。
/// <summary>
/// 实现树节点的过滤查询
/// </summary>
private void InitSearchControl()
{
  this.searchControl1.Client = this.tree;
  this.tree.FilterNode += (object sender, DevExpress.XtraTreeList.FilterNodeEventArgs e) =>
  {
    if (tree.DataSource == null)
      return;
    string nodeText = e.Node.GetDisplayText("Name");//参数填写FieldName
    if (string.IsNullOrWhiteSpace(nodeText))
      return;
    bool isExist = nodeText.IndexOf(searchControl1.Text, StringComparison.OrdinalIgnoreCase) >= 0;
    if (isExist)
    {
      var node = e.Node.ParentNode;
      while (node != null)
      {
        if (!node.Visible)
        {
          node.Visible = true;
          node = node.ParentNode;
        }
        else
          break;
      }
    }
    e.Node.Visible = isExist;
    e.Handled = true;
  };
}
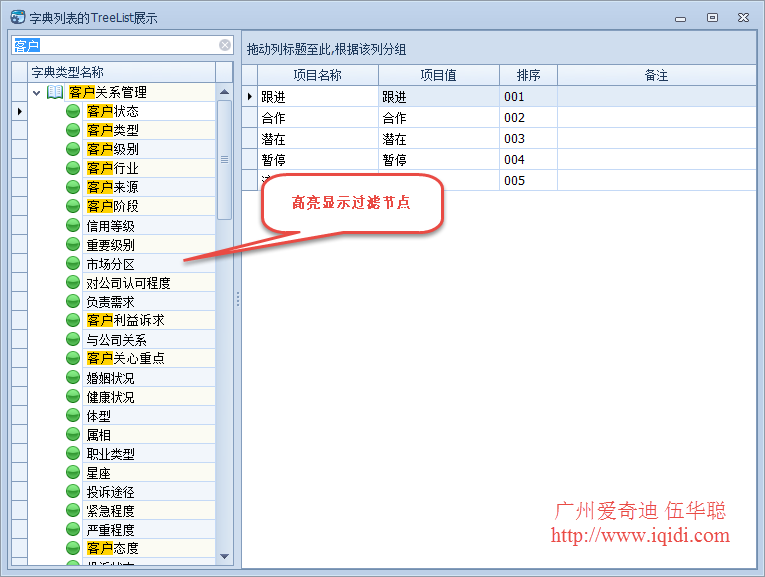
实现效果如下所示, 对于符合记录的查询,那么会有高亮的颜色进行重点标注。

以上就是本文的全部内容,希望本文的内容对大家的学习或者工作能带来一定的帮助,同时也希望多多支持海外IDC网!
