Unity Shader实现素描效果
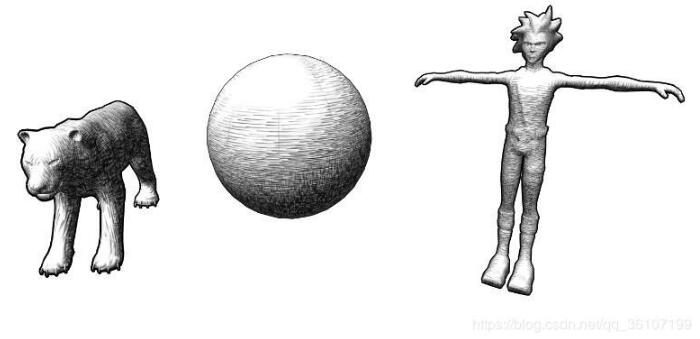
本文实例为大家分享了Unity Shader实现素描效果的具体代码,供大家参考,具体内容如下
这是乐乐大佬书里的非真实渲染,其中的算法还是挺有意思的,感兴趣的小伙伴可以试一试。
素描效果基本原理:先将物体进行描边画出轮廓,计算物体的漫反射部分,漫反射越暗表明颜色越暗,然后根据漫反射的值来设置采样贴图的权重。
采样贴图:


shader部分:
Shader "Unlit/Sketch"
{
 Properties
 {
 _Color("Color",Color) = (1,1,1,1)
 //贴图平铺系数
  _TileFactor("TileFactor", Range(0, 10)) = 1
 _Hatch0("Hatch0",2D)="white"{}
  _Hatch1("Hatch1",2D) = "white"{}
  _Hatch2("Hatch2",2D) = "white"{}
  _Hatch3("Hatch3",2D) = "white"{}
  _Hatch4("Hatch4",2D) = "white"{}
  _Hatch5("Hatch5",2D) = "white"{}
 //描边系数
 _OutlineFactor("OutlineFactor",Range(0.0,0.1))=0.01
 }
 SubShader
 {
 Tags{ "Queue" = "Transparent" }
 //描边使用两个Pass,第一个pass沿法线挤出一点,只输出描边的颜色
 Pass
 {
 //剔除正面,只渲染背面
 Cull Front
 //关闭深度写入
 ZWrite Off
 //控制深度偏移,描边pas【文章出处:http://www.yidunidc.com/hkzq.html欢迎转载】s远离相机一些,防止与正常pass穿插
 Offset 1,1

 CGPROGRAM
   #include "UnityCG.cginc"
   #pragma vertex vert
   #pragma fragment frag
  float _OutlineFactor;

  struct v2f
  {
  float4 pos : SV_POSITION;
  };

  v2f vert(appdata_full v)
  {
  v2f o;
  o.pos = UnityObjectToClipPos(v.vertex);
  //将法线方向转换到视空间
  float3 vnormal = mul((float3x3)UNITY_MATRIX_IT_MV, v.normal);
  //将视空间法线xy坐标转化到投影空间
  float2 offset = TransformViewToProjection(vnormal.xy);
  //在最终投影阶段输出进行偏移操作
  o.pos.xy += offset * _OutlineFactor;
  return o;
  }

  fixed4 frag(v2f i) : SV_Target
  {
  return float4(0,0,0,1);
  }
 ENDCG
 }


 Pass
 {
 CGPROGRAM
   #include "UnityCG.cginc"
   #include "Lighting.cginc"
 //使用阴影需添加
   #include "AutoLight.cginc"
 #pragma vertex vert
 #pragma fragment frag
 //使主要平行光产生阴影
   #pragma multi_compile_fwdbase


 float4 _Color;
   float _TileFactor;
 sampler2D _Hatch0;
 sampler2D _Hatch1;
 sampler2D _Hatch2;
 sampler2D _Hatch3;
 sampler2D _Hatch4;
 sampler2D _Hatch5;

 struct v2f
 {
 float2 uv : TEXCOORD0;
 float4 vertex : SV_POSITION;
 //6张依次加深的贴图
 float3 hatchWeights0:TEXCOORD1;
 float3 hatchWeights1:TEXCOORD2;
 //声明阴影
 SHADOW_COORDS(4)
 float3 worldPos:TEXCOORD3;
 };

 v2f vert (appdata_full v)
 {
 v2f o;
 o.vertex = UnityObjectToClipPos(v.vertex);
 //平铺系数越大,显示的贴图越密集
 o.uv = v.texcoord* _TileFactor;
 float3 worldLightDir = normalize(WorldSpaceLightDir(v.vertex));
 float3 worldNormal = UnityObjectToWorldNormal(v.normal);
 //漫反射
 float diffuse = max(0, dot(worldLightDir, worldNormal));
 o.worldPos = mul(unity_ObjectToWorld, v.vertex).xyz ;
 //六张图片的权重
 o.hatchWeights0 = float3(0, 0, 0);
 o.hatchWeights1 = float3(0, 0, 0);
 //根据漫反射值计算权重,漫反射越暗,线条越密集
 float hatchFactor = diffuse * 7.0;
 if (hatchFactor > 6.0) {
 }
 else if (hatchFactor > 5.0) {
  o.hatchWeights0.x = hatchFactor - 5.0;
 }
 else if (hatchFactor > 4.0) {
  o.hatchWeights0.x = hatchFactor - 4.0;
  o.hatchWeights0.y = 1.0 - o.hatchWeights0.x;
 }
 else if (hatchFactor > 3.0) {
  o.hatchWeights0.y = hatchFactor - 3.0;
  o.hatchWeights0.z = 1.0 - o.hatchWeights0.y;
 }
 else if (hatchFactor > 2.0) {
  o.hatchWeights0.z = hatchFactor - 2.0;
  o.hatchWeights1.x = 1.0 - o.hatchWeights0.z;
 }
 else if (hatchFactor > 1.0) {
  o.hatchWeights1.x = hatchFactor - 1.0;
  o.hatchWeights1.y = 1.0 - o.hatchWeights1.x;
 }
 else {
  o.hatchWeights1.y = hatchFactor;
  o.hatchWeights1.z = 1.0 - o.hatchWeights1.y;
 }
 //把计算的阴影传到fragment中
 TRANSFER_SHADOW(o);
 return o;
 }

 fixed4 frag (v2f i) : SV_Target
 {
 float4 hatchTex0 = tex2D(_Hatch0, i.uv) * i.hatchWeights0.x;
 float4 hatchTex1 = tex2D(_Hatch1, i.uv) * i.hatchWeights0.y;
 float4 hatchTex2 = tex2D(_Hatch2, i.uv) * i.hatchWeights0.z;
 float4 hatchTex3 = tex2D(_Hatch3, i.uv) * i.hatchWeights1.x;
 float4 hatchTex4 = tex2D(_Hatch4, i.uv) * i.hatchWeights1.y;
 float4 hatchTex5 = tex2D(_Hatch5, i.uv) * i.hatchWeights1.z;
 //漫反射暗色部分权重越大,白色越少
 float4 whiteColor = float4(1, 1, 1, 1)*(1 - i.hatchWeights0.x - i.hatchWeights0.y - i.hatchWeights0.z - i.hatchWeights1.x - i.hatchWeights1.y - i.hatchWeights1.z);
 float4 hatchColor = hatchTex0 + hatchTex1 + hatchTex2 + hatchTex3 + hatchTex4 + hatchTex5+ whiteColor;
 //使物体接受阴影
 UNITY_LIGHT_ATTENUATION(atten, i, i.worldPos);
 return float4(hatchColor.rgb*_Color.rgb*atten, 1.0);
 }
 ENDCG
 }
 }
}
以上就是本文的全部内容,希望对大家的学习有所帮助,也希望大家多多支持海外IDC网。
