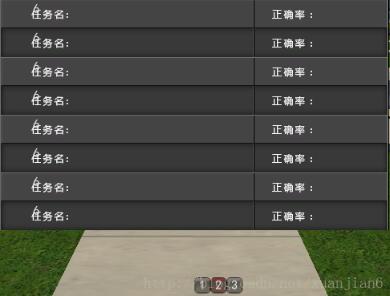
Unity3D实现列表分页效果
本文实例为大家分享了Unity3D实现列表分页效果的具体代码,供大家参考,具体内容如下
using System.Collections.Generic;
using UnityEngine;

public class Page : MonoBehaviour {
  public List<string> Tips = new List<string>();
  public Texture2D DetailImg1;
  public Texture2D DetailImg2;

  private int pageCount = 0;//当前记录所需页数
  private static int currentPage =【原URL http://www.yidunidc.com/jap.html 请说明出处】 1;//当前页码

  void OnGUI() {
    pageCount = Mathf.CeilToInt(Tips.Count / 8.0f);//计算当前的页码总数
    int m_count = 0;//计算当前页的记录数
    if (currentPage != pageCount)//判断是否是最后一页,若不是则每页绘制8条记录
    {
      m_count = 8;
    }
    else {
      if (Mathf.CeilToInt((Tips.Count + 1) / 8.0f) > pageCount)//判断最后一页是否有8条记录
      {
        m_count = 8;
      }
      else
      {
        m_count = Tips.Count % 8;//计算最后一页的记录数
      }
    }

    for (int i = 0; i < m_count; i++)
    {
      if (i % 2 == 0)
      {
        GUI.DrawTexture(new Rect(268, 253 + i * 36, 487, 36), DetailImg1);
      }
      else
      {
        GUI.DrawTexture(new Rect(268, 253 + i * 36, 487, 36), DetailImg2);
      }
      GUI.Label(new Rect(310, 253 + i * 36, 300, 36), Tips[(currentPage - 1) * 8 + i]);
    }
    //超过一页内容时,显示页码跳转
    if (pageCount > 1) {
      float temp = Screen.width / 2 - pageCount / 2 * 20;
      for (int i = 1; i <= pageCount; ++i) {
        //更改按钮样式
        if (currentPage == i)
        {
          GUI.backgroundColor = Color.red;
        }
        else
        {
          GUI.backgroundColor = Color.white;
        }
        //绘制按钮
        if (GUI.Button(new Rect(temp + 20 * i, 600, 20, 20), i.ToString())) {
          currentPage = i;//更改当前选中的页
        }
      }
    }
  }
}

以上就是本文的全部内容,希望对大家的学习有所帮助,也希望大家多多支持海外IDC网。
