利用Service Fabric承载eShop On Containers的实现方法
从Pet Shop 到eShop on Container都是Microsoft在技术演进的路径上给开发者展示.Net的开发能力和架构能力的Sample工程,Petshop的时候更多的是展现应用的分层架构,设计的抽象与模块间的通讯。到了eShop on Container更多的关注在架构设计与微服务化的,下面我们先来看看eshop on Container的架构图
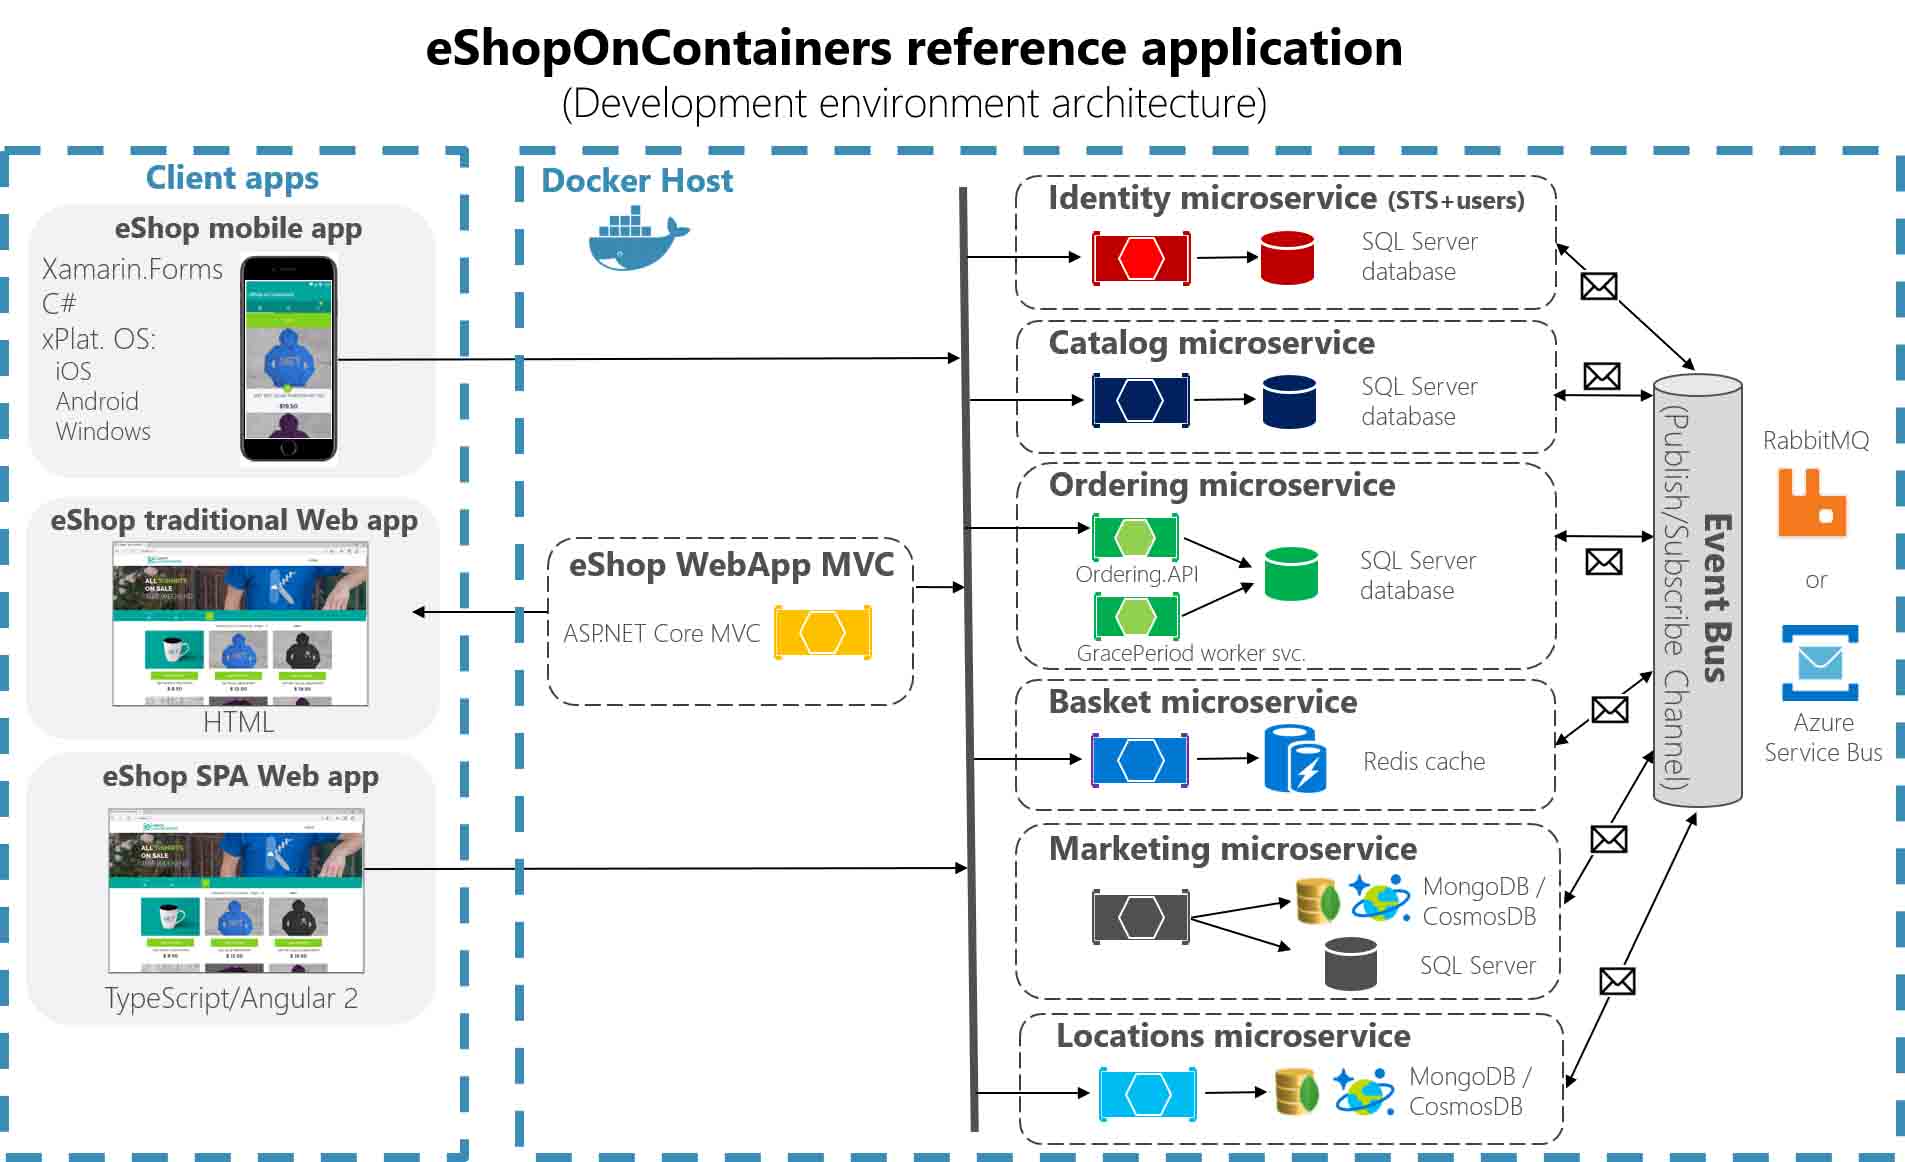
在上图,我们可以看到后端服务分成了
1 Identity microservice(验证服务)
2 Catalog microservice(商品分类服务)
3 Ordering microservice(订单服务)
4 Basket microservice(购物车服务)
5 Marketing microservice(市场营销服务)
6 Locations microservice(地理位置信息服务)
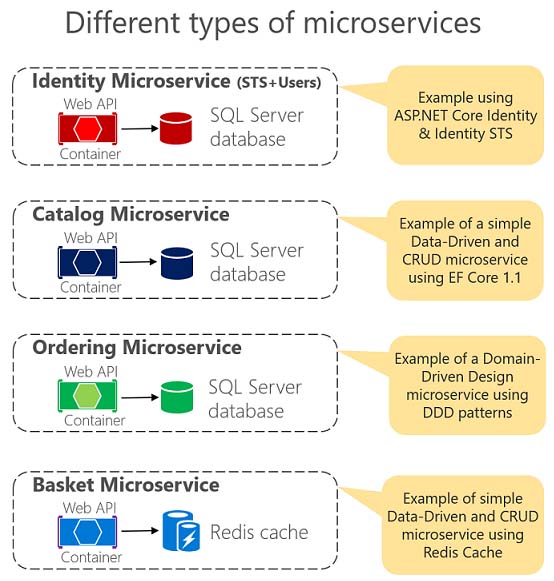
在以前的分层架构中,通常这些服务都是以某一模块来体现的,为什么现在要将他们拆分成了各个服务呢?当我们从业务场景上面来看这些服务时,我们会发现每个服务的访问峰值时间区间、容量规划都是不一样的,甚至实现这些服务最方便最简单的技术栈都有可能是不一样的(当然强大的.net core无所不能,但是公司内不同业务线上的技术储备不一样,就有可能选择不同的技术实现)。这是因为如果我们都将这些模块整合到了一个程序或者服务中的时候,就会碰到在不同时间内服务高峰期扩展系统容量困难,要不就是资源不足,要不就是资源过剩。譬如抢购业务开始前大家提前个半小时登录了系统,这时候系统最忙的是登录模块,到了开始抢购时间,系统最忙的是订单模块。不采用微服务架构的话,半小时前准备给登录模块使用的资源不一定能够及时的释放出来给订单模块。如果两个模块都使用单一程序架构的话,很可能出现的情况就是抢购的业务把所有资源都占满了了,连其他正常访问系统的用户资源都被占用掉,导致系统崩溃。在讲究Dev/Ops的今天,开发人员和架构师需要更多的考虑硬件架构层面对程序应用带来的影响。
用Service Fabric来承载eShop on Container微服务的方法一,通过Service Fabric直接管理Docker
首先我们先到Azure上申请一个Container Registry来承载eShop各个微服务程序的镜像(image).创建Azure Docker Registry可以参考官方文档:https://docs.microsoft.com/zh-cn/azure/container-registry/
现在最新版本Service Fabric已经可以直接管理编排Docker了。
1.创建一个类型为Container的Service
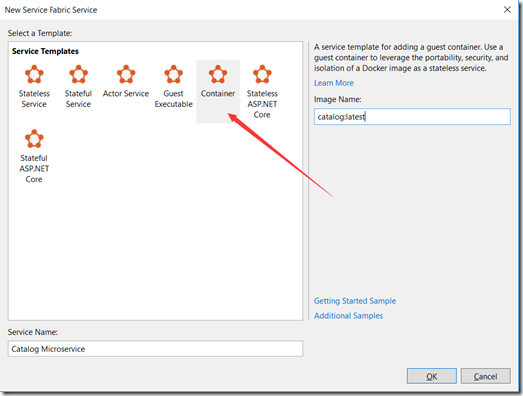
2.在servicemanifest.xml中描述清楚image所在路径
<CodePackage Name="Code" Version="1.0.0">
 <!-- Follow this link for more information about deploying Windows containers to Service Fabric: https://aka.ms/sfguestcontainers -->
 <EntryPoint>

  <ContainerHost>
  <ImageName>eshopsample.azurecr.io/catalog:latest</ImageName>
  </ContainerHost>
 </EntryPoint>
 <!-- Pass environment variables to your container: -->
 <EnvironmentVariables>
  <EnvironmentVariable Name="HttpGatewayPort" Value=""/>
 </EnvironmentVariables>
 </CodePackage>
这里非常简单,指定了image所在位置就好了,如果本身Docker Image里需要很多配置信息譬如:数据库链接串、其他服务的地址等等都可以在EnvironmentVariables里面去配置。
3.配置Registry的访问账号密码,需要在ApplicationManifest.xml上面来配置
<ServiceManifestImport>
 <ServiceManifestRef ServiceManifestName="CatalogService_Pkg" ServiceManifestVersion="1.0.1" />
 <Policies>
  <ContainerHostPolicies CodePackageRef="Code" Isolation="hyperv">
  <RepositoryCredentials AccountName="youraccount" Password="xxxxxxxxxxxxx" PasswordEncrypted="false"/>
  <PortBinding ContainerPort="80" EndpointRef="CatalogServieEndpoint"/>

  </ContainerHostPolicies>
 </Policies>
 </ServiceMani【文章来自:http://www.yidunidc.com/gfcdn.html 欢迎留下您的宝贵建议】festImport>
整个过程不会太复杂,只要配置好了Catalog microserivce的ServiceManifest.xm和ApplicationManifest.xml文件之后,我们可以用同样的方法将其他服务一一配置完成,然后我们就可以将Service Fabric的配置Publish到Cluster上面了。
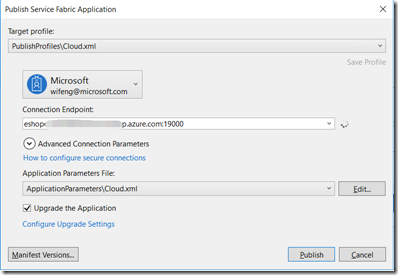
Service Fabric会自动根据配置在Cluster上面Pull Image和将Docker运行起来。非常简单
用Service Fabric承载eShop on Container微服务的方法二:用Service Fabric的Runtime运行eShop on Container的微服务
Service Fabric本身就是个微服务的开发框架,现在已经直接支持了.net Core 2.0了所以,我们更新了Service Fabric的SDK之后就可以直接创建.net core的服务了
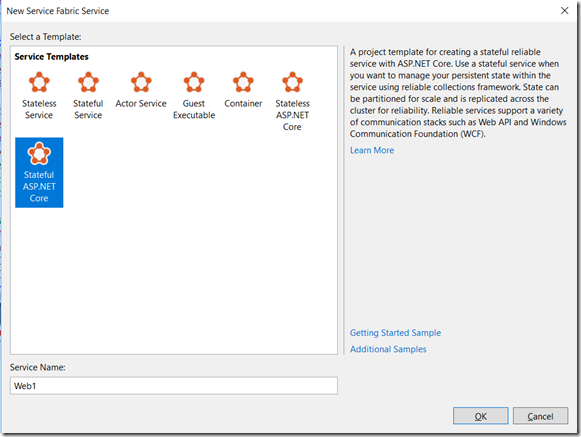
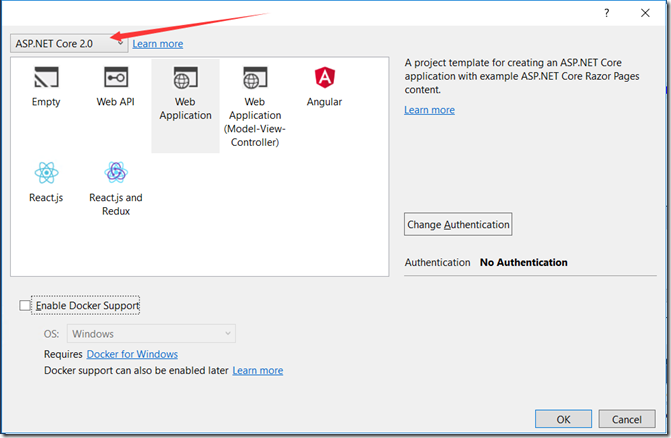
eShop on Container的代码都已经是一份成型的.net core 2.0的代码,所以不需要重新编写服务。
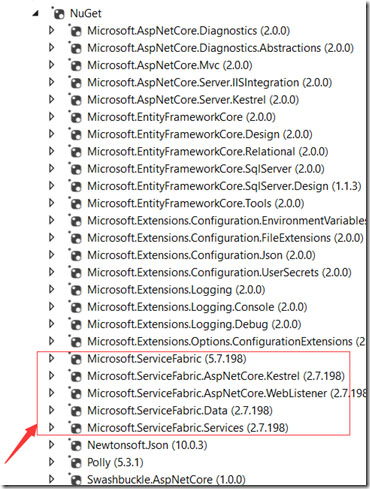
1.通过nuget添加最新的Service Fabric最新的SDK。
2.修改programe.cs,启动ServiceFabric Runtime而不是直接启动Asp.net WebHost
public static void Main(string[] args)
  {
   try
   {
    // ServiceManifest.XML 文件定义一个或多个服务类型名称。
    // 注册服务会将服务类型名称映射到 .NET 类型。
    // 在 Service Fabric 创建此服务类型的实例时,
    // 会在此主机进程中创建类的实例。
    ServiceRuntime.RegisterServiceAsync("Catalog.API",
     context => new CatalogAPI(context)).GetAwaiter().GetResult();
    ServiceEventSource.Current.ServiceTypeRegistered(Process.GetCurrentProcess().Id, typeof(CatalogAPI).Name);
    // 防止此主机进程终止,以使服务保持运行。
    Thread.Sleep(Timeout.Infinite);
   }
   catch (Exception e)
   {
    ServiceEventSource.Current.ServiceHostInitializationFailed(e.ToString());
    throw;
   }
}
3.编写
CatalogAPI 类用于启动WebHost
internal sealed class CatalogAPI : StatelessService
 {
  public CatalogAPI(StatelessServiceContext context)
   : base(context)
  { }
  /// <summary>
  /// Optional override to create listeners (like tcp, http) for this service instance.
  /// </summary>
  /// <returns>The collection of listeners.</returns>
  protected override IEnumerable<ServiceInstanceListener> CreateServiceInstanceListeners()
  {
   return new ServiceInstanceListener[]
   {
    new ServiceInstanceListener(serviceContext =>
     new KestrelCommunicationListener(serviceContext, "ServiceEndpoint", (url, listener) =>
     {
      ServiceEventSource.Current.ServiceMessage(serviceContext, $"Starting WebListener on {url}");
            return new WebHostBuilder()
           .UseKestrel()
         .ConfigureServices(
          services => services
           .AddSingleton<StatelessServiceContext>(serviceContext))
         .UseContentRoot(Directory.GetCurrentDirectory())
         .ConfigureAppConfiguration((builderContext, config) =>
         {
          IHostingEnvironment env = builderContext.HostingEnvironment;
          config.AddJsonFile("settings.json", optional: false, reloadOnChange: true)
           .AddJsonFile($"appsettings.{env.EnvironmentName}.json", optional: true, reloadOnChange: true);

         })
         .UseStartup<Startup>()
         .UseServiceFabricIntegration(listener, ServiceFabricIntegrationOptions.None)
         .UseUrls(url)
         .UseWebRoot("Pics")
         .Build();
     }))
   };
  }
 }
4.编写serviceManifest.xml描述服务端口等信息
<?xml version="1.0" encoding="utf-8"?>
<ServiceManifest Name="Catalog.APIPkg"
     Version="1.0.3"
     xmlns="http://schemas.microsoft.com/2011/01/fabric"
     xmlns:xsd="http://www.w3.org/2001/XMLSchema"
     xmlns:xsi="http://www.w3.org/2001/XMLSchema-instance">
 <ServiceTypes>
  <StatelessServiceType ServiceTypeName="Catalog.API" />
 </ServiceTypes>
 <!-- Code package is your service executable. -->
 <CodePackage Name="Code" Version="1.0.3">
 <EntryPoint>
  <ExeHost>
  <Program>Catalog.API.exe</Program>
  <WorkingFolder>CodePackage</WorkingFolder>
  </ExeHost>
 </EntryPoint>
 <EnvironmentVariables>
  <EnvironmentVariable Name="ASPNETCORE_ENVIRONMENT" Value="Development"/>
 </EnvironmentVariables>
 </CodePackage>

 <ConfigPackage Name="Config" Version="1.0.1" />
 <Resources>

 <Endpoints>

  <Endpoint Protocol="http" Name="ServiceEndpoint" Type="Input" Port="5101" />
 </Endpoints>
 </Resources>
</ServiceManifest>
5.修改AppcationManifest.xml增加几个服务的描述信息
添加ServiceImport节
<ServiceManifestImport>
 <ServiceManifestRef ServiceManifestName="Catalog.APIPkg" ServiceManifestVersion="1.0.3" />
 <ConfigOverrides />
 </ServiceManifestImport>
在DefaultService中描述Service
<Service Name="Catalog.API" ServiceDnsName="catalog.fabric.api">
  <StatelessService ServiceTypeName="Catalog.API" InstanceCount="[Catalog.API_InstanceCount]">
  <SingletonPartition />
  </StatelessService>
 </Service>
这样我们就可以将Catalog这个服务改造成可以通过Service Fabric来管理的微服务了。通过Publish,我们可看到几个服务都已经在Service Fabric下面接受管理和编排了。
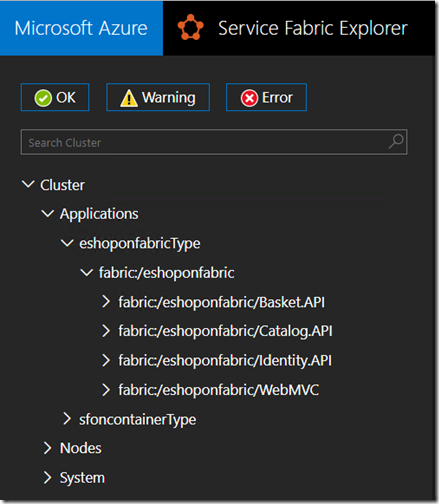
访问localhost:5100
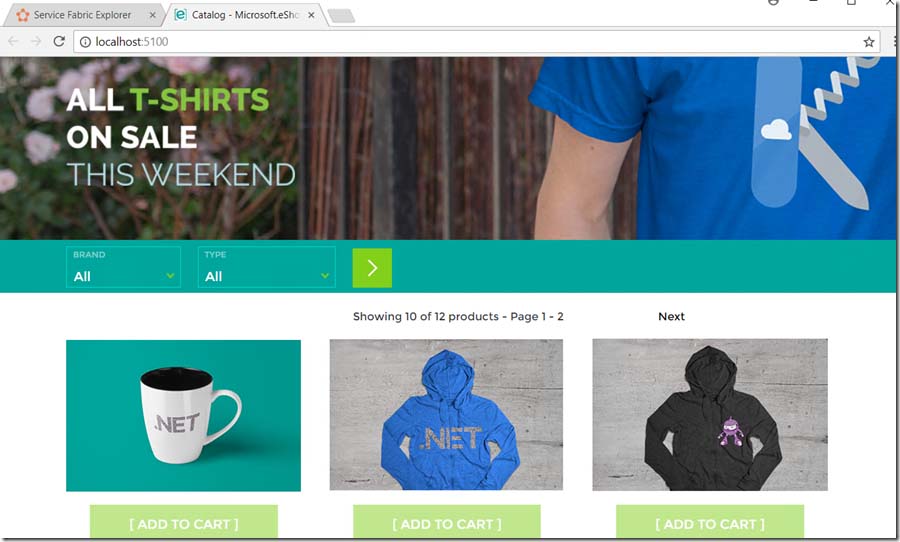
以上这篇利用Service Fabric承载eShop On Containers的实现方法就是小编分享给大家的全部内容了,希望能给大家一个参考,也希望大家多多支持海外IDC网。
