WPF实现钟表效果
【来源:http://www.yidunidc.com/hkgf.html网络转载请说明出处】
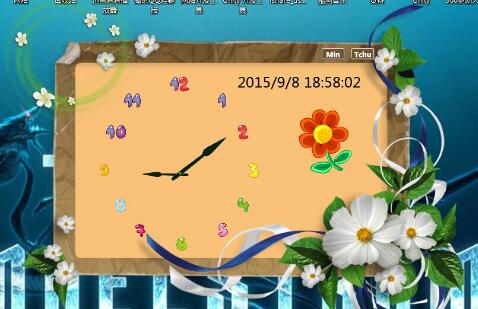
和之前一样首先看一下WPF钟表效果图

是不是很炫酷,上面的那个花都是带有动画效果的图片 。
接下来就是代码了。
首先看一下整个场景的布局搭建
<Window x:Class="QQDemo1.DateTimew"
    xmlns="http://schemas.microsoft.com/winfx/2006/xaml/presentation"
    xmlns:x="http://schemas.microsoft.com/winfx/2006/xaml"
    Title="DateTimew" Height="700" Width="800" Loaded="Window_Loaded" Name="datatime">
  <Window.Resources>
    <Storyboard x:Key="zhuanRote">
      <DoubleAnimation RepeatBehavior="Forever" From="0" To="360" Duration="1:0:0" Storyboard.TargetName="fenImg" Storyboard.TargetProperty="RenderTransform.Angle"></DoubleAnimation>
      <DoubleAnimation RepeatBehavior="Forever" From="0" To="360" Duration="0:1:0" Storyboard.TargetName="xiaoshiImg" Storyboard.TargetProperty="RenderTransform.Angle"></DoubleAnimation>
      <DoubleAnimation RepeatBehavior="Forever" From="0" To="360" Duration="0:0:5" Storyboard.TargetName="zhImg" Storyboard.TargetProperty="RenderTransform.Angle"></DoubleAnimation>
      <DoubleAnimationUsingKeyFrames Storyboard.TargetName="huaImg" RepeatBehavior="Forever" Storyboard.TargetProperty="RenderTransform.Angle">
        <EasingDoubleKeyFrame Value="10" KeyTime="0:0:2"></EasingDoubleKeyFrame>
        <EasingDoubleKeyFrame Value="30" KeyTime="0:0:4"></EasingDoubleKeyFrame>
        <EasingDoubleKeyFrame Value="0" KeyTime="0:0:6"></EasingDoubleKeyFrame>
        <EasingDoubleKeyFrame Value="-10" KeyTime="0:0:8"></EasingDoubleKeyFrame>
        <EasingDoubleKeyFrame Value="-30" KeyTime="0:0:10"></EasingDoubleKeyFrame>
      </DoubleAnimationUsingKeyFrames>
    </Storyboard>
  </Window.Resources>
  <Window.Triggers>
    <EventTrigger RoutedEvent="Loaded">
      <BeginStoryboard Storyboard="{StaticResource zhuanRote}"></BeginStoryboard>
    </EventTrigger>
  </Window.Triggers>
  <Canvas>
    <Button Width="40" Height="20" Margin="560,113" Panel.ZIndex="1" Background="#72532E" Foreground="White" Content="Min" FontWeight="SemiBold" Click="Button_Click"></Button>
    <Button Width="40" Height="20" Margin="610,113" Panel.ZIndex="1" Background="#72532E" Foreground="White" Content="Tchu" FontWeight="SemiBold" Click="Button_Click_1"></Button>
    <Border Width="529" Height="330" Margin="145,138" Background="#FAC178"></Border>
    <Label Width="236" Height="40" Margin="480,150" Name="time" FontSize="24" Canvas.Left="-66"></Label>
    <Image Width="120" Height="140" RenderTransformOrigin="0.5,0.5" Name="huaImg" Margin="510,200" Source="/QQDemo1;component/TimeImage/2224.png">
      <Image.RenderTransform>
        <RotateTransform></RotateTransform>
      </Image.RenderTransform>
    </Image>
    <Image Width="90" Name="fenImg" Height="40" RenderTransformOrigin="0,0.8" Margin="251,306" Source="/QQDemo1;component/TimeImage/wwww.png">
      <Image.RenderTransform>
        <RotateTransform></RotateTransform>
      </Image.RenderTransform>
    </Image>
    <Image Name="xiaoshiImg" Width="48" Height="134" Margin="300,242" RenderTransformOrigin="0.5,0.8" Source="/QQDemo1;component/TimeImage/www.png" Canvas.Top="-26">
      <Image.RenderTransform>
        <RotateTransform></RotateTransform>
      </Image.RenderTransform>
    </Image>
    <Image Width="867" Height="700" Source="/QQDemo1;component/TimeImage/3.png"></Image>
    <Image Width="30" Height="30" Margin="300,160" Source="TimeImage/11.png"></Image>
    <Image Width="30" Height="30" Margin="314,160" Source="TimeImage/12.png"></Image>
    <Image Name="zhImg" RenderTransformOrigin="0.5,0.5" Width="376" Margin="0,0" Height="356" Source="TimeImage/22230.png" Canvas.Left="-59" Canvas.Top="-44">
      <Image.RenderTransform>
        <RotateTransform></RotateTransform>
      </Image.RenderTransform>
    </Image>
    <Image Width="30" Height="30" Margin="310,430" Source="TimeImage/16.png"></Image>
    <Image Width="30" Height="30" Margin="430,305" Source="TimeImage/13.png"></Image>
    <Image Width="30" Height="30" Margin="180,305" Source="TimeImage/19.png"></Image>
    <Image Width="30" Height="30" Margin="390,200" Source="TimeImage/11.png" Canvas.Left="-10" Canvas.Top="-12"></Image>
    <Image Width="30" Height="30" Margin="420,255" Source="TimeImage/12.png" Canvas.Left="-6" Canvas.Top="-14" ImageFailed="Image_ImageFailed"></Image>
    <Image Width="30" Height="30" Margin="380,190" Source="TimeImage/14.png" Canvas.Left="34" Canvas.Top="174"></Image>
    <Image Width="30" Height="30" Margin="390,190" Source="TimeImage/15.png" Canvas.Left="-10" Canvas.Top="216"></Image>
    <Image Width="30" Height="30" Margin="390,190" Source="TimeImage/17.png" Canvas.Left="-148" Canvas.Top="216"></Image>
    <Image Width="30" Height="30" Margin="400,190" Source="TimeImage/18.png" Canvas.Left="-193" Canvas.Top="174"></Image>
    <Image Width="30" Height="30" Margin="400,200" Source="TimeImage/10.png" Canvas.Left="-193" Canvas.Top="41"></Image>
    <Image Width="30" Height="30" Margin="400,200" Source="TimeImage/11.png" Canvas.Left="-208" Canvas.Top="41"></Image>
    <Image Width="30" Height="30" Margin="370,200" Source="TimeImage/11.png" Canvas.Left="-148" Canvas.Top="-12"></Image>
    <Image Width="30" Height="30" Margin="320,160" Source="TimeImage/11.png" Canvas.Left="-84" Canvas.Top="28"></Image>
  </Canvas>
</Window>
场景的搭建比较死板,没有用代码去创建整个场景,位置都是自己一个一个的慢慢的摆放的比较随意。
下面就是程序的代码了。
using System;
using System.Collections.Generic;
using System.Linq;
using System.Text;
using System.Windows;
using System.Windows.Controls;
using System.Windows.Data;
using System.Windows.Documents;
using System.Windows.Input;
using System.Windows.Media;
using System.Windows.Media.Imaging;
using System.Windows.Shapes;
using System.Timers;
using System.Windows.Navigation;
using System.Windows.Threading;

namespace QQDemo1
{
  /// <summary>
  /// DateTime.xaml 的交互逻辑
  /// </summary>
  public partial class DateTimew : Window
  {
    public DateTimew()
    {

      DispatcherTimer timer = new DispatcherTimer(); //时间相当于Timer
      timer.Tick += new EventHandler(timer_Tick);
      //timer.Interval = TimeSpan.FromSeconds(0.1);
      timer.Start();
      InitializeComponent();
      this.datatime.WindowStyle = System.Windows.WindowStyle.None;
      //this.datatime.WindowState = System.Windows.WindowState.Normal;

      this.datatime.AllowsTransparency = true;//透明
      this.Background = Brushes.Transparent;//背景透明5
      this.datatime.WindowStartupLocation = System.Windows.WindowStartupLocation.CenterScreen;
      //this.time.Content = ;
     // DateTime d = new DateTime();

     // this.xiaoshiImg.RenderTransformOrigin = new Point(0.85,0.85);


    }
    void timer_Tick(object sender, EventArgs e)
    {
      this.time.Content = DateTime.Now.ToString(); //Tick 事件
    }

    private void Window_Loaded(object sender, RoutedEventArgs e)
    {

    }

    private void Image_ImageFailed(object sender, ExceptionRoutedEventArgs e)
    {

    }

    private void Button_Click(object sender, RoutedEventArgs e)
    {
      this.WindowState = System.Windows.WindowState.Minimized;
    }

    private void Button_Click_1(object sender, RoutedEventArgs e)
    {

      this.Close();
    }

  }
}
这个动画的实现实在场景里面去实现的。下一节,会说到在代码里面如何去控制整个动画的实现!
以上就是本文的全部内容,希望对大家的学习有所帮助,也希望大家多多支持海外IDC网。
