Flutter时间轴Timeline的实现
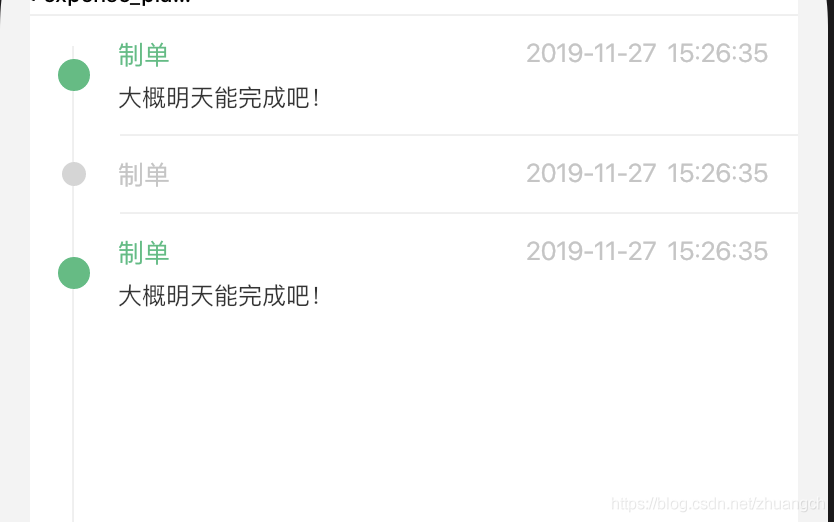
首先看看时间轴效果图

实现的难点就是左边的时间线,右边的事件说白了就是一个ListView,仔细观察一下会发现圆圈在ListView的一个item上,想明白这些我们就可以把圆圈和右边的事件作为一个listitem实现,左边的竖线可以有两种实现方法
1)listItem是一个Row,Row里含有一条竖线
2)Stack实现,Stack有两个child widget,一个是竖线,一个是ListView
本文简单用第二种来实现它,废话少说先上代码
@override
  Widget build(BuildContext context) {
    return Card(
      elevation: 0,
      margin: EdgeInsets.symmetric(horizontal: 15, vertical: 50),
      child: Stack(
        fit: StackFit.loose,
        children: <Widget>[
          // 左边的竖线
          Positioned(
            left: 21,
            top: 15,
            bottom: 15,
            child: VerticalDivider(
              width: 1,
            ),
          ),
          // 右边的事件列表
          ListView.separated(
            padding: EdgeInsets.zero,
            itemCount: events.length,
            physics: NeverScrollableScrollPhysics(),
            shrinkWrap: true,
            itemBuilder: (BuildContext context, int index) {
              return FlowEventRow(events[index]);
            },
            separatorBuilder: (BuildContext context, int index) {
              return Divider(
                height: 1,
                indent: 45,
              );
            },
          ),
        ],
      ),
    );
  }
代码很简单我就不作过多解释,主要来解释下事件行FlowEventRow怎么实现左边的圆圈
直接看代码
class FlowEvent {
  const FlowEvent({
    this.advise,
    @required this.date,
    @required this.author,
    this.isCompleted = true,
  });

  final String advise;
  final DateTime date;
  final bool isCompleted;
  final String author;

  bool get hasAdvise =>
      isCompleted && advise != null ? advise?.isNotEmpty : false;
}

@immutable
class FlowEventRow extends StatelessWidget {
  const FlowEventRow(this.event);

  final FlowEvent event;

  double get circleRadius => event.isCompleted ? 8 : 6;
  Color get circleColor =>
      event.isCompleted ? const Color(0xFF40BE7F) : const Color(0xFFD5D5D5);

  @override
  Widget build(BuildContext context) {
    final Color dimColor = const Color(0xFFC5C5C5);
    final Color highlightColor = const Color(0xFF40BE7F);

    return Padding(
      padding: EdgeInsets.symmetric(vertical: 10),
      child: Row(
        children: <Widget>[
          Padding(
            padding: EdgeInsets.symmetric(horizontal: 22.0 - circleRadius),
            child: Container(
              width: circleRadius * 2,
              height: circleRadius * 2,
              decoration: BoxDecoration(
                shape: BoxShape.circle,
                color: circleColor,
              ),
            ),
          ),
          Expanded(
            child: Padding(
              padding: EdgeInsets.only(left: 0, right: 15),
              child: Column(
                mainAxisSize: MainAxisSize.min,
                crossAxisAlignment: CrossAxisAlignment.start,
                children: <Widget>[
                  Row(
                    children: <Widget>[
                      Expanded(
                        child: Text(
                          '制单',
                          style: TextStyle(
                            fontSize: 13,
                            color:
                                event.isCompleted ? highlightColor : dimColor,
                          ),
                        ),
                      ),
                      Text(
                        DateUtils.formatDay(event.date, withHms: true),
                        style: Theme.of(context)
                            .textTheme
                            .caption
                            .copyWith(color: dimColor),
                      )
                    ],
                  ),
                  ...event.hasAdvise
                      ? [
                          SizedBox(
                            height: 4,
                          ),
                          Text(
                            event.advise ?? '',
                            style: Theme.of(context)
                                .textTheme
                                .body1
                                .copyWith(fontSize: 12),
                          )
                        ]
                      : [],
                ],
              ),
            ),
          ),
        ],
      ),
    );
  }
build方法有点长,但实现圆圈的代码很少
Padding(
            padding: EdgeInsets.symmetric(horizontal: 22.0 - circleRadius),
            child: Container(
              width: circleRadius * 2,
              height: circleRadius * 2,
              decoration: BoxDecoration(
                shape: BoxShape.circle,
                color: circleColor,
              ),
            ),
          ),
坐标的计算就是通过左边竖线的x坐标 - 圈圈的半径获得,至此我们就实现了简单的timeline
到此这篇关于Flutter时间轴Timeline的实现的文章就介绍到这了,更多相关Flutter时间轴 内容请搜索海外IDC网以前的文章或继续浏览下面的相关文章希望大家以后多多支持海外IDC网!
【文章来源:新加坡服务 欢迎留下您的宝贵建议】