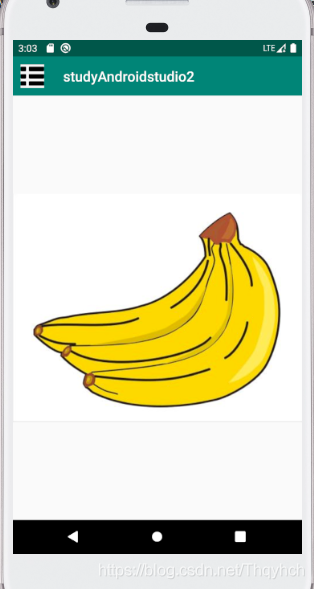
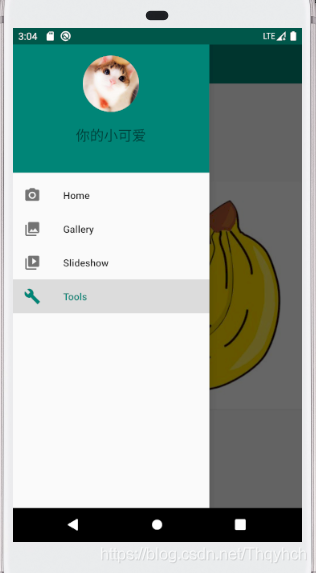
使用DrawerLayout完成滑动菜单的示例代码
用Toolbar编写自定义导航栏,在AndroidManifest.xml中你要编滑动菜单的界面处加入如下代码
<activity android:name=".DrawerLayoutActivity"
      android:theme="@style/NoTitle"></activity>
在values下的styles.xml中加入
<style name="NoTitle" parent="Theme.AppCompat.Light.NoActionBar">//隐藏原有导航栏
    //以下两条均为颜色的设置
    <item name="colorPrimary">@color/colorPrimary</item>
    <item name="colorPrimaryDark">@color/colorPrimaryDark</item>
  </style>
新建两个布局文件(用于主布局文件的调用)
important.xml
<?xml version="1.0" encoding="utf-8"?>
<LinearLayout xmlns:android="http://schemas.android.com/apk/res/android"
  xmlns:app="http://schemas.android.com/apk/res-auto"
  android:orientation="vertical"
  android:layout_width="match_parent"
  android:layout_height="match_parent">
  <androidx.appcompat.widget.Toolbar
    android:id="@+id/toolbar"
    android:layout_width="match_parent"
    android:layout_height="?attr/actionBarSize"
    android:background="?attr/colorPrimary"
    android:theme="@style/ThemeOverlay.AppCompat.Dark.ActionBar"
    app:popupTheme="@style/ThemeOverlay.AppCompat.Light" />
  <ImageView
    android:layout_width="match_parent"
    android:layout_height="match_parent"
    android:src="@drawable/b" />
</LinearLayout>
left.xml
<?xml version="1.0" encoding="utf-8"?>
<LinearLayout xmlns:android="http://schemas.android.com/apk/res/android"
  android:orientation="vertical"
  android:layout_width="match_parent"
  android:layout_height="match_parent"
  android:background="?attr/colorPrimary"
  android:padding="40dp">
  <de.hdodenhof.circleimageview.CircleImageView//将图片圆形化的控件(Design Support库中提供)
    android:layout_width="80dp"
    android:layout_height="80dp"
    android:src="@drawable/cat"
    android:scaleType="centerCrop"
    android:layout_gravity="center"/>
  <TextView
    android:layout_width="wrap_content"
    android:layout_height="wrap_content"
    android:layout_marginTop="20dp"
    android:text="你的小可爱"
    android:textSize="20sp"
    android:layout_gravity="center"/>
</LinearLayout>
将上面圆形化图片控件的库引入到项目中
在app/build.gradle的dependencies闭包中加入如下内容
dependencies {
  implementation fileTree(include: ['*.jar'], dir: 'libs')
  implementation 'androidx.appcompat:appcompat:1.2.0'
  implementation 'androidx.constraintlayout:constraintlayout:1.1.3'
  implementation 'de.hdodenhof:circleimageview:2.1.0'//这是需要添加的
  testImplementation 'junit:junit:4.12'
  androidTestImplementation 'androidx.test.ext:junit:1.1.1'
  androidTestImplementation 'androidx.test.espresso:espressocore:3.2.0'
}
在res目录下新建一个menu文件夹,在menu文件夹下新建一个nav_menu.xml文件,这里的图片是事先准备好的
<?xml version="1.0" encoding="utf-8"?>
<menu xmlns:android="http://schemas.android.com/apk/res/android"
  xmlns:tools="http://schemas.android.com/tools"
  tools:showIn="navigation_view">
  <group android:checkableBehavior="single">
    <item
      android:id="@+id/nav_home"
      android:icon="@drawable/ic_menu_camera"
      android:title="Home" />
    <item
      android:id="@+id/nav_gallery"
      android:icon="@drawable/ic_menu_gallery"
      android:title="Gallery" />
    <item
      android:id="@+id/nav_slideshow"
      android:icon="@drawable/ic_menu_slideshow"
      android:title="Slideshow" />
    <item
      android:id="@+id/nav_tools"
      android:icon="@drawable/ic_menu_manage"
      android:title="Tools" />
  </group>
</menu>
主布局文件activity_drawer_layout.xml,我们用到了DrawerLayout 布局,这里面的NavigationView和上面的将图片圆形化的控件一样也需要将库引入到项目中
<?xml version="1.0" encoding="utf-8"?>
<androidx.drawerlayout.widget.DrawerLayout xmlns:android="http://schemas.android.com/apk/res/android"
  xmlns:app="http://schemas.android.com/apk/res-auto"
  android:layout_width="match_parent"
  android:layout_height="match_parent"
  xmlns:tools="http://schemas.android.com/tools"
  android:id="@+id/drawer_layout"
  android:fitsSystemWindows="true"
  tools:openDrawer="start">
  <include
    layout="@layout/important"//引入上面编好的important.xml文件
    android:layout_width="match_parent"
    android:layout_height="match_parent" />
  <com.google.android.material.navigation.NavigationView
    android:id="@+id/nav_view"
    android:layout_width="wrap_content"
    android:layout_height="match_parent"
    android:layout_gravity="start"
    android:fitsSystemWindows="true"
    app:headerLayout="@layout/left"//引入上面编好的left.xml文件
    app:menu="@menu/nav_menu">//引入上面编好的nav_menu.xml文件
  </com.google.android.material.navigation.NavigationView>
</androidx.drawerlayout.widget.DrawerLayout>
将上面NavigationView的库引入到项目中
在app/build.gradle的dependencies闭包中加入如下内容
dependencies {
  implementation fileTree(include: ['*.jar'], dir: 'libs')
  implementation 'androidx.appcompat:appcompat:1.2.0'
  implementation 'androidx.constraintlayout:constraintlayout:1.1.3'
  implementation 'androidx.navigation:navigation-fragment:2.3.0'//这里是需要添加的
  implementation 'androidx.navigation:navigation-ui:2.3.0'//这里是需要添加的
  implementation 'de.hdodenhof:circleimageview:2.1.0'
  testImplementation 'junit:junit:4.12'
  androidTestImplementation 'androidx.test.ext:junit:1.1.1'
  androidTestImplementation 'androidx.test.espresso:espressocore:3.2.0'
在DrawerLayoutActivity.java中编写代码
import androidx.annotation.NonNull;
import androidx.appcompat.app.ActionBar;
import androidx.appcompat.app.AppCompatActivity;
import androidx.appcompat.widget.Toolbar;
import androidx.core.view.GravityCompat;
import androidx.drawerlayout.widget.DrawerLayout;

import android.os.Bundle;
import android.view.Menu;
import android.view.MenuItem;
import android.widget.Toast;

import com.google.android.material.navigation.NavigationView;

public class DrawerLayoutActivity extends AppCompatActivity {
  private DrawerLayout mDrawerlayout;
  private ActionBar actionBar;
  @Override
  protected void onCreate(Bundle savedInstanceState) {
    super.onCreate(savedInstanceState);
    setContentView(R.layout.activity_drawer_layout);
    mDrawerlayout=findViewById(R.id.drawer_layout);//得到DrawerLayout实例
    NavigationView navigationView=findViewById(R.id.nav_view);//获取到NavigationView实例
    Toolbar toolbar = findViewById(R.id.toolbar);//找到Toobar控件
    setSupportActionBar(toolbar);//用setSupportActionBar方法将导航栏设置为我们自定义的Toolbar
    actionBar=getSupportActionBar();//用getSupportActionBar()方法实例化导航栏(这里的导航栏就是我们自定义的Toolbar)
    if(actionBar!=null){
      actionBar.setDisplayHomeAsUpEnabled(true);//让左上角的导航按钮显示出来
      actionBar.setHomeAsUpIndicator(R.drawable.caidan);//设置导航按钮图标(图片是提前准备好的)
    }
    navigationView.setCheckedItem(R.id.nav_home);//调用NavigationView的setCheckedItem方法将Home菜单设置为默认选中
    navigationView.setNavigationItemSelectedListener(new NavigationView.OnNavigationItemSelectedListener() {//设置菜单选中事件的监听器
      @Override
      public boolean onNavigationItemSelected(@NonNull MenuItem menuItem) {
        mDrawerlayout.closeDrawers();//选中后关闭菜单
        return true;
      }
    });
  }
   @Override
  public boolean onOptionsItemSelected(@NonNull MenuItem item) {//加入的导航按钮的点击事件
    switch (item.getItemId()){
      case android.R.id.home:
        mDrawerlayout.openDrawer(GravityCompat.START);//调用DrawerLayout的openDrawer方法将菜单展示出来
        actionBar=null;
        break;
      default:
    }
    return true;
  }
 }
运行结果展示:


总结
到此这篇关于使用DrawerLayout完成滑动菜单的示例代码的文章就介绍到这了,更多相关DrawerLayout完成滑动菜单内容请搜索海外IDC网以前的文章或继续浏览下面的相关文章希望大家以后多多支持海外IDC网!
