Android实现悬浮可拖拽的Button
本文实例为大家分享了Android实现悬浮可拖拽Button的具体代码,供大家参考,具体内容如下
1、简介
最近,因为项目需要,需要制作一个界面上可拖拽的按钮,网上也有多实例,看了下大部分都是示例不全或讲解不清晰,效果图也不明显,借此自己记录一番自己的实现方案,以备不时之需,同时也为广大学者可以直接通过拷贝方式完成项目所需。
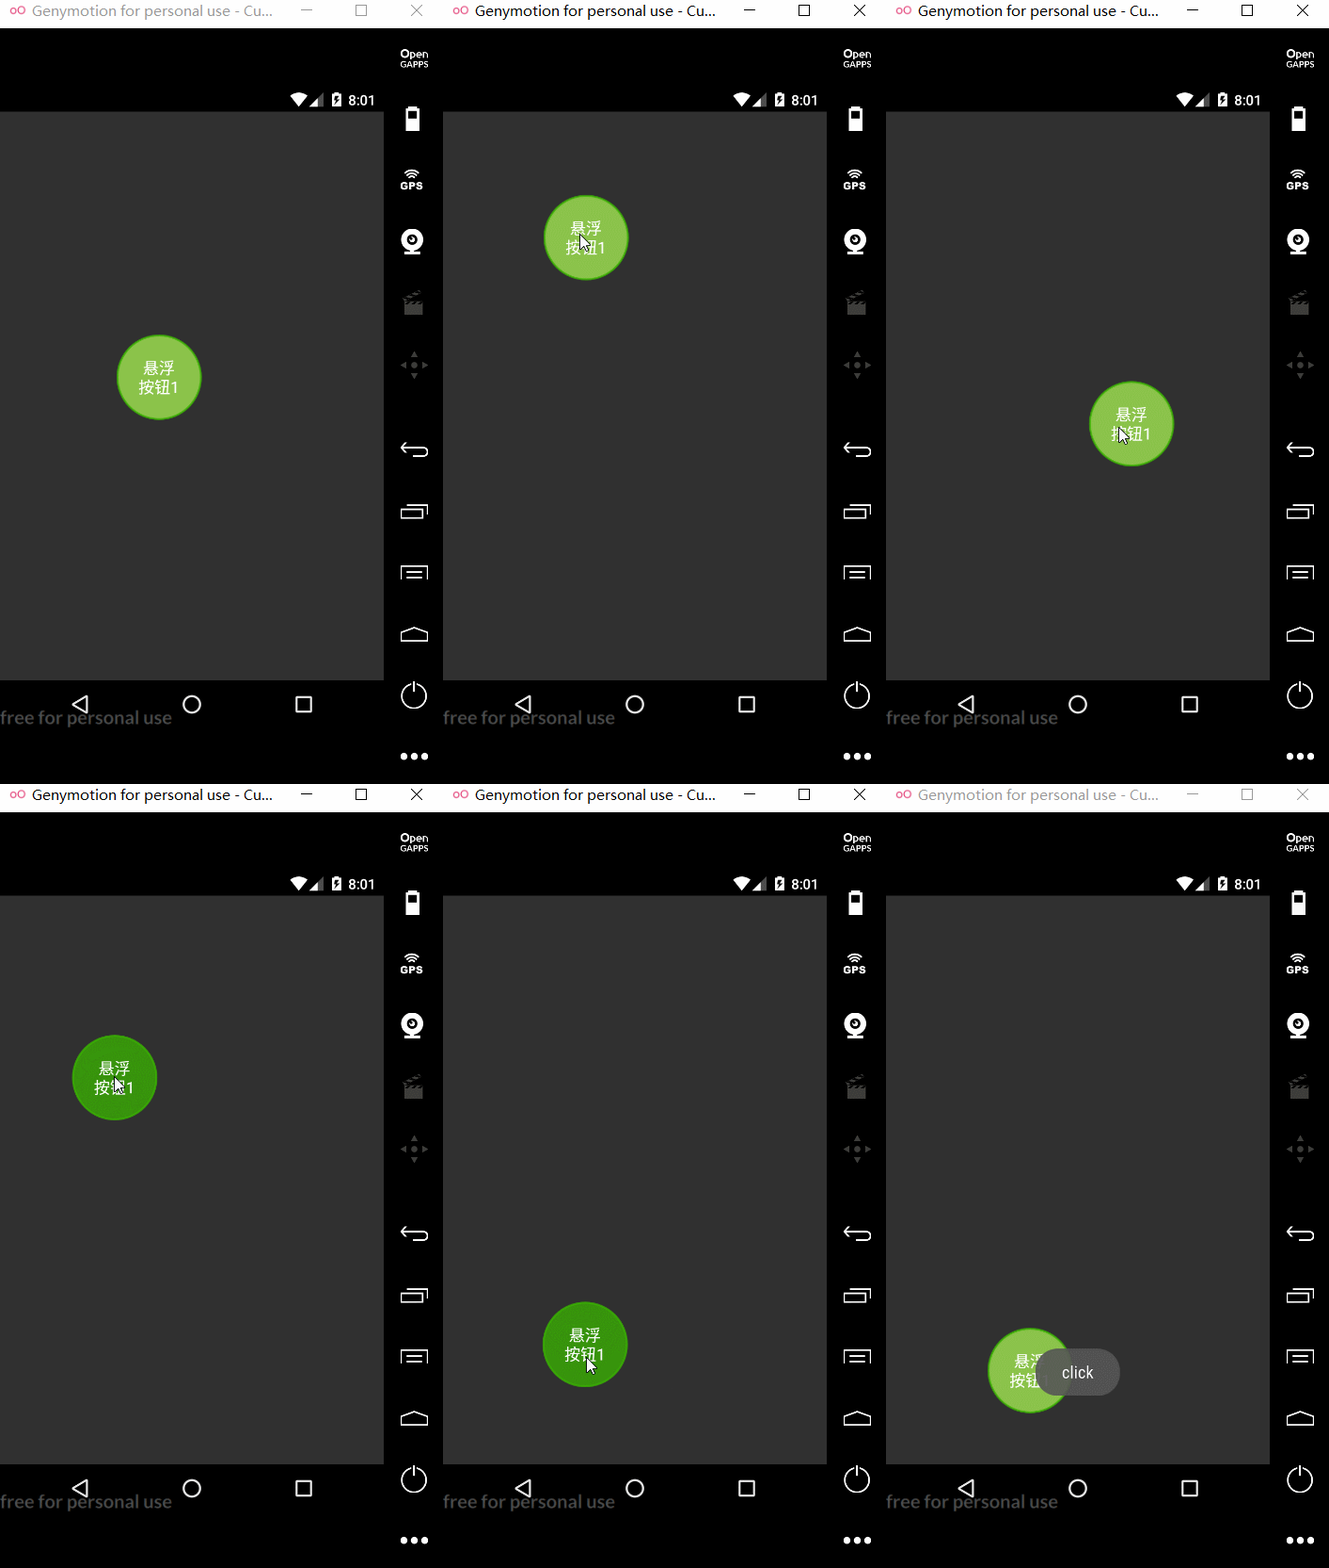
2、效果图
在开始代码之前,首先看看效果图,如下:

3、核心代码实现
3.1 DraggingButton 实现
public class DraggingButton extends android.support.v7.widget.AppCompatButton {

  private int lastX = 0;
  private int lastY = 0;
  private int beginX = 0;
  private int beginY = 0;

  private int screenWidth = 720;
  private int screenHeight = 1280;


  public DraggingButton(Context context) {
    this(context, null);
  }

  public DraggingButton(Context context, @Nullable AttributeSet attrs) {
    this(context, attrs, 0);
  }

  public DraggingButton(Context context, @Nullable AttributeSet attrs, int defStyleAttr) {
    super(context, attrs, defStyleAttr);

    initData(context);
  }

  private void initData(Context context){
    WindowManager wm = (WindowManager) context.getSystemService(Context.WINDOW_SERVICE);
    DisplayMetrics dm = new DisplayMetrics();
    wm.getDefaultDisplay().getMetrics(dm);
    screenWidth = dm.widthPixels;
    screenHeight = dm.heightPixels;
  }

  @Override
  public boolean onTouchEvent(MotionEvent event)
  {

    switch (event.getAction())
    {
      case MotionEvent.ACTION_DOWN:
        lastX = (int) event.getRawX();   // 触摸点与屏幕左边的距离
        lastY = (int) event.getRawY();   // 触摸点与屏幕上边的距离
        beginX = lastX;
        beginY = lastY;
        break;
      case MotionEvent.ACTION_MOVE:

        int dx =(int)event.getRawX() - lastX;    // x轴拖动的绝对距离
        int dy =(int)event.getRawY() - lastY;    // y轴拖动的绝对距离

        // getLeft(): 子View的左边界到父View的左边界的距离, getRight():子View的右边界到父View的左边界的距离
        // 如下几个数据表示view应该在布局中的位置
        int left = getLeft() + dx;
        int top = getTop() + dy;
        int right = getRight() + dx;
        int bottom = getBottom() + dy;
        if(left < 0){
          left = 0;
          right = left + getWidth();
        }
        if(right > screenWidth){
          right = screenWidth;
          left = right - getWidth();
        }
        if(top < 0){
          top = 0;
          bottom = top + getHeight();
        }
        if(bottom>screenHeight){
          bottom = screenHeight;
          top = bottom - getHeight();
        }
        layout(left, top, right, bottom);
        lastX = (int) event.getRawX();
        lastY = (int) event.getRawY();
        break;
      case MotionEvent.ACTION_UP:
        // 解决拖拽的时候松手点击事件触发
        if (Math.abs(lastX - beginX) < 10 && Math.abs(lastY - beginY) < 10){
          return super.onTouchEvent(event);
        }else{
          setPressed(false);
          return true;
        }
      default:
        break;
    }
    return super.onTouchEvent(event);
  }
}
核心代码已经奉献,通过自定义的DraggingButton即可实现可拖拽功能,具体原理主要在于onTouchEvent和layout两个函数的使用,具体细节不在讲述,代码注释比较清晰。
4、举个栗子
4.1 activity中的布局
<?xml version="1.0" encoding="utf-8"?>
<LinearLayout xmlns:android="http://schemas.android.com/apk/res/android"
  xmlns:app="http://schemas.android.com/apk/res-auto"
  xmlns:tools="http://schemas.android.com/tools"
  android:layout_width="match_parent"
  android:layout_height="match_parent"
  android:orientation="vertical">
  <com.android.study.example.uidemo.dragging.DraggingButton
    android:id="@+id/tv_dragging"
    android:layout_width="80dp"
    android:layout_height="80dp"
    android:gravity="center"
    android:background="@drawable/drag_button_bg"
    android:layout_margin="20dp"
    android:padding="10dp"
    android:text="悬浮\n按钮1"
    android:textSize="15sp"
    android:layout_gravity="right"
    android:textColor="#ffffff"/>
</LinearLayout>
4.2 样式 drag_button_bg.xml
<?xml version="1.0" encoding="utf-8"?>
<selector xmlns:android="http://schemas.android.com/apk/res/android">
  <item android:state_pressed="true">
    <shape android:shape="oval">
      <!--填充颜色-->
      <solid android:color="#bf39b500" />
      <!--描边-->
      <stroke android:width="2dp" android:color="#bf39b500" />
    </shape>
  </item>
  <item>
    <shape android:shape="oval">
      <!--填充颜色-->
      <solid android:color="#ff8bc34a" />
      <!--描边-->
      <stroke android:width="2dp" android:color="#bf39b500"/>
    </shape>
  </item>
</selector>
4.3 activity 中的代码
private DraggingButton mDraggintView;
mDraggintView = (DraggingButton) findViewById(R.id.tv_dragging);
  mDraggintView.setOnClickListener(new View.OnClickListener() {
   @Override
   public void onClick(View v) {
    Toast.makeText(FloatingActionBtnTestActivity.this, "click", Toast.LENGTH_SHORT).show();
   }
  });
以上就是本文的全部内容,希望对大家的学习有所帮助,也希望大家多多支持海外IDC网。
